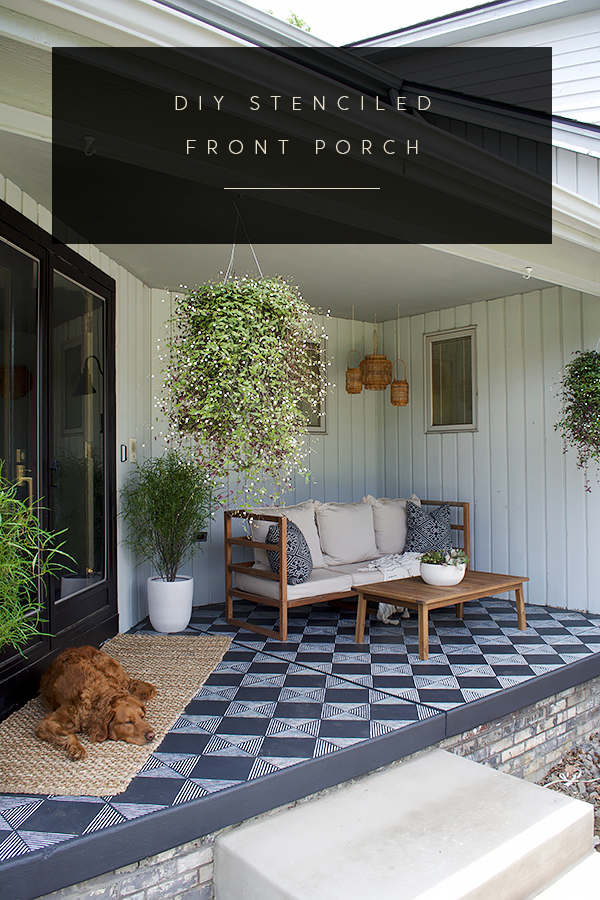
DIY STENCILED PORCH MAKEOVER
Our front porch has never been my favorite so I decided to spruce it up with some paint from Ace Hardware. My DIY Stenciled Porch Makeover was totally transformative and brought this space to life!
This post is sponsored by Ace Hardware. I received compensation and product, but all opinions and content are my own.
I admit, I’m not a huge fan of stenciling – at least not in our home. I think it looks cool when other people do it but it just never felt right for my style. But I’m all about challenging myself and taking risks!
So when Ace challenged me to a DIY paint project using the Clark+Kensington 2020 Color Trends Palettes, I decided to go bold and stencil our front porch concrete floor.

One of the hardest things about starting a paint project is deciding on the color, right? I know I struggle big time with this and can spend hours staring at paint samples in the store.
Luckily, choosing from the Color Trends Palettes made things way easier – so many beautiful, on trend colors perfectly picked and curated just waiting for you to pick up a paint brush and use them!
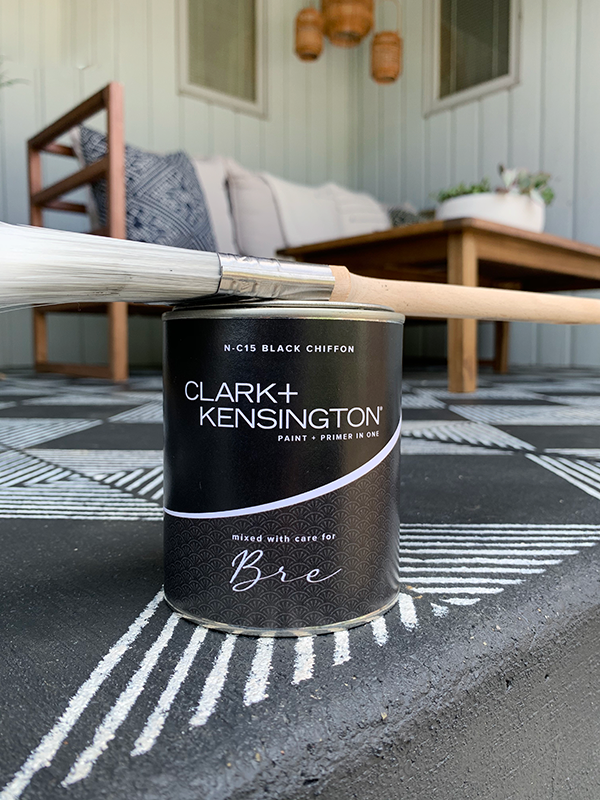
I decided on Black Chiffon and Bone White. Two gorgeous contrasting colors that would really make my stencil pattern pop.
If you’re still struggling with choosing the right paint color you can check out The Paint Studio at Acehardware.com. Here you can upload a photo of your space and try out colors before even heading into the store. It will also tell you everything you need to get for your project and offer tips and tutorials from pros.

I’ve never painted concrete before and had so many questions. The staff at my local Ace Hardware were amazing and so helpful in making sure I had everything I needed to get started.
They have over 5,000 stores and the majority of them are independently owned and operated by local entrepreneurs which I love. I’m all about supporting small businesses.
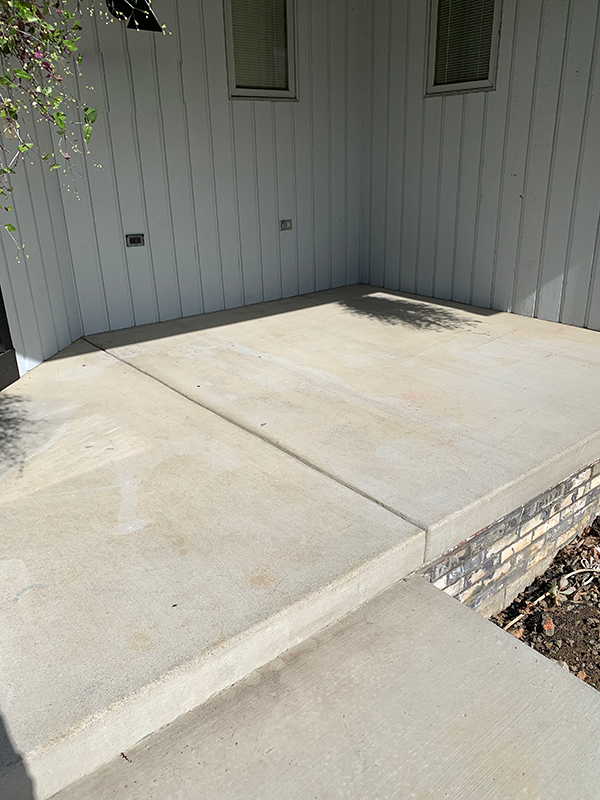
To give you an idea of where we started – here is a before photo of our porch. Definitely in need of some TLC. Right before I started this project, we had our walkway redone which made a huge difference too!
We’re also in the middle of a landscaping project so just ignore the dirt and rocks in front of our porch 😉

Ok, so once I had all my paint and supplies it was time to get started!

I’ll walk you through the whole process step by step and show you how easy it was to stencil our front porch!
HOW TO STENCIL CONCRETE
CLEAN YOUR SURFACE
You might only need to give it a good sweep, but the best way to get all the accumulated grime and dirt off is with a pressure washer. It’s amazing how well these things work! I could use it all day.

We did it at night so it had plenty of time to dry before we started work on it the next day.
After! So satisfying isn’t it?!
PREPARE YOUR SURFACE
In the morning, I gave it a quick sweep with the broom just to get off any little leaves or dirt that the wind had blown up.
Then I used some painters tape to tape around the edges.

PAINT YOUR BASE COAT
Some outdoor paints require a base coat before you even apply your color, but Ace’s Royal Porch + Floor Paint doesn’t which makes things go a lot quicker!

Don’t overlook this step. It’s important to think carefully about the shape of your stencil and what color you want to be more prominent. If you follow me on instagram, you know I had to paint and repaint and then paint again the base color.
I had quite the adventure with this project and even switched stencils at one point, but it was all worth it in the end.
My base color is the Black Chiffon which I applied using a small 2″ angled brush around the edges and then a foam roller for the rest. This went fairly quickly and I only did 1 thick coat.

The can says to let it dry for 24 hours before recoating so I waited until the next day to do the stencil!
STENCIL!
Now’s the fun part! Or maybe not if your a perfectionist 😉 Stenciling isn’t easy and I think why I’ve always steered clear of it indoors was because I would want it to look PERFECT. Which is challenging.
Outside, I feel like it’s ok if it looks a little more worn especially since the stencil I was using mimics handmade concrete tiles which have a lot of variation throughout anyway.
First you’ll want to figure out where to start your stencil. Think about what section of the space will be seen the most and be sure to start with a full pattern there. I started at the front of the porch near the steps and worked my way to the right and then back.

Use some painters tape to hold your stencil in place. I used it only on two sides and that seemed to be sufficient. My stencil wasn’t huge though. If yours is bigger you may need more tape.
Once your stencil is in place – grab your brush! I used this large wax brush.

Apply a SMALL amount of paint to the tip of your brush and then dab the majority of it off onto a paper towel. This step is KEY. You do not want excess paint on your brush – this causes bleeding and your stencil will look all blotchy. A little paint goes a long way.
I used the color Bone White.

When applying your paint, just dab it on moving your brush up and down quickly.
Peel off your tape and pull back your stencil!

The cool thing about this stencil, is that it has cut outs on 3 of the corners, so you can line up your next spot easily and you know it’s square.
And another reason it’s helpful to use a very light coat of paint is that it will dry faster and allow you to lay down your next stencil more quickly.
REPEAT until you’ve stenciled your whole area! I did as many full stencils as I could and then had to go back and do some partial ones along the outer perimeter. If you need to, you can cut your stencil so it lays flat.


FINISH
A lot of paints also require a top coat to seal your work, but the Royal Porch + Floor Paint has polyurethane in it already and it meant to resist chipping, stains etc. So once you’re done, you’re done! How amazing is that?!
Now you can sit back and admire your work and enjoy your newly stenciled space!


There are a lot of changes I’d like to make to our exterior, but for now, this newly stenciled porch has made such a difference! What do you think of my DIY Stenciled Porch Makeover? Have you stenciled anything in your own home?
My friend Aniko stenciled her wall and it looks amazing!
Thank you to Ace Hardware for equipping me with the perfect products to bring my vision to life!


Larissa ~ Prodigal Pieces
Bre, your talent shines again. Beautiful!
Lisa
Wow! That looks fantastic. Good job!!!
Sharon C
Wow, that looks absolutely amazing. What a beautiful transformation. Well done!!!
brepurposed
Thank you so much!!!
Scarlet
I love this stenciled porch. It is such a gorgeous idea and great way to add style and class with a low expense.
Alicia
Wow!!! What a difference. I love the stencil and colors you chose.
MaryEl
Bravo!! Amazing!!
Bebe
Do you mind stating the cost of this product per gallon. There is no Ace dealer in our town but about 30 miles away.
Kris C.
Wow! You did a great job and it looks amazing. I once stenciled our old wood coffee table and it looked pretty cheesy. LOL
Joann Krmaer
I think it looks fabulous! Nice choice of colors and pattern. Could you show a picture of where the stencil met the wall? I’ve done stenciling but only inside.
Kafelyn Lilly
I love it!! it looks amazing!
Karen
Beautiful Bre.
Kathy
Wow! What an improvement! I’m so impressed. I’ve done stenciling in places, but a porch floor had not occurred to me as an option. I love not needing a sealer. Anything to reduce the number of steps. Thank you for sharing!