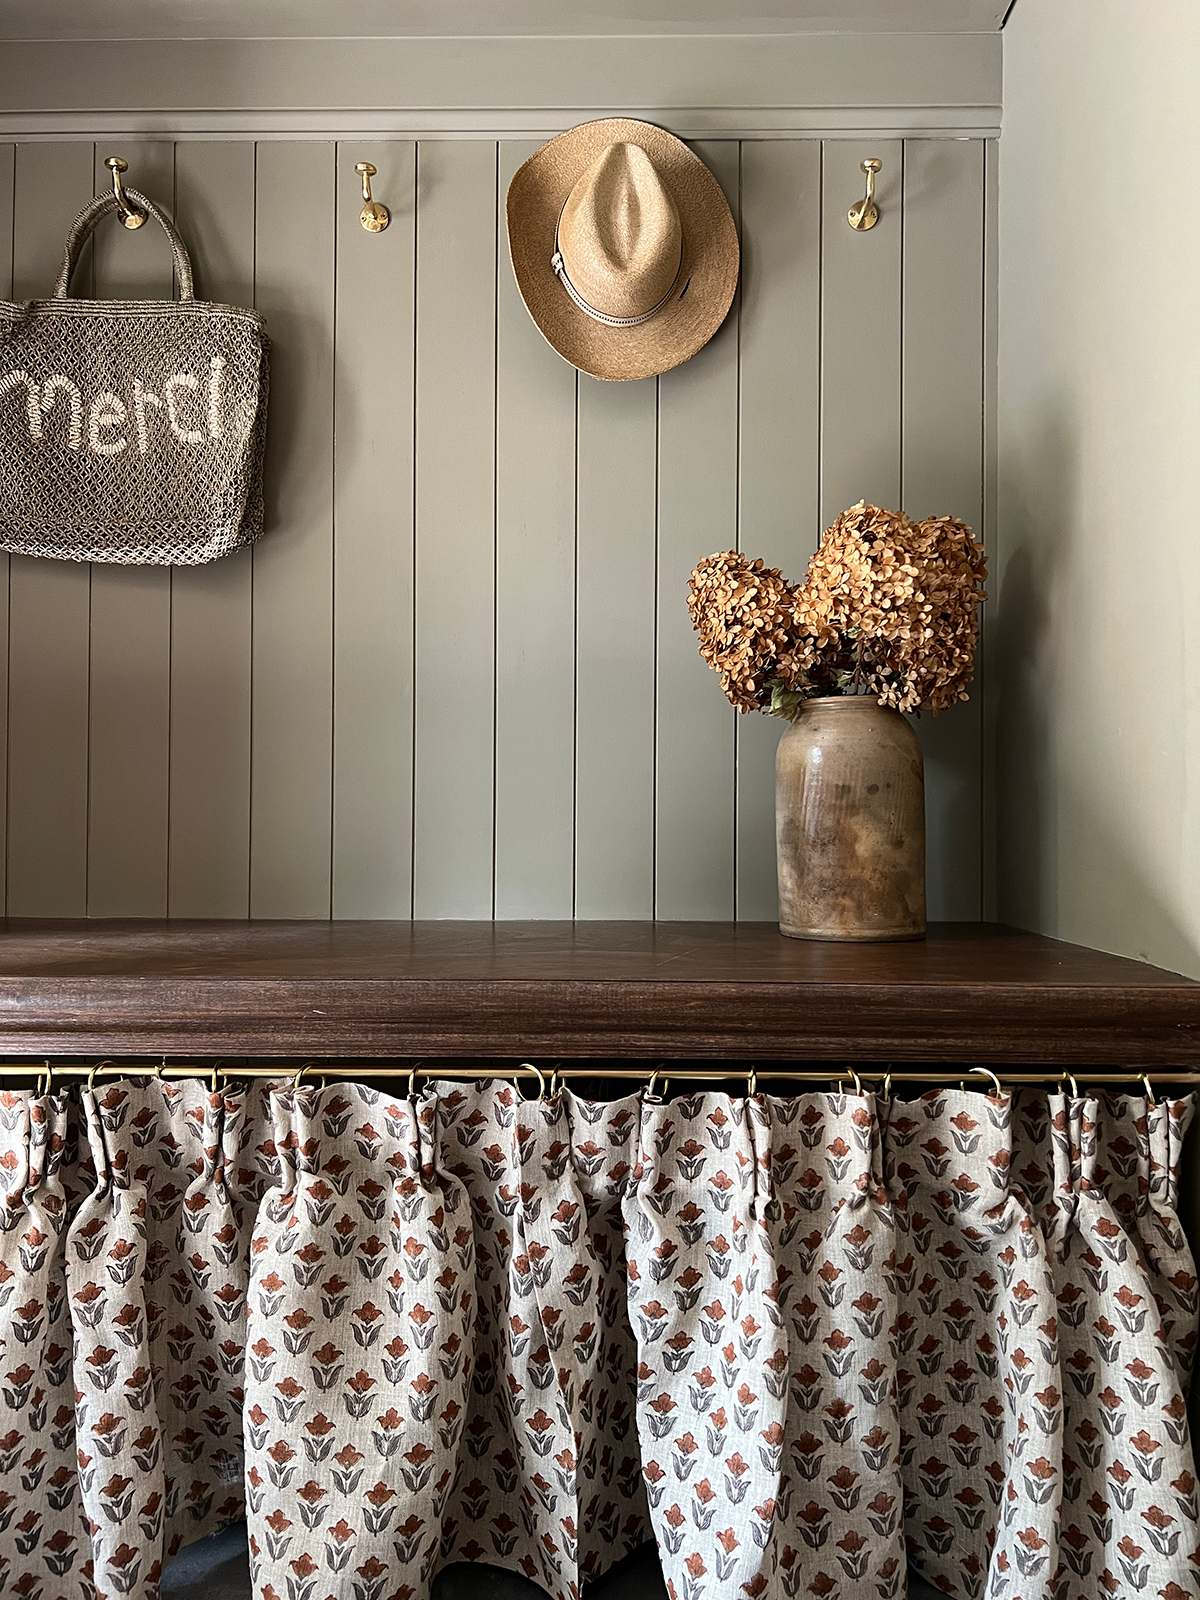
When I started planning for our laundry room update, I knew I needed a solution for hiding all our shoes under the bench. I was constantly lining them up and trying to keep them organized and it always just looked like a hot mess. I love the look of a sink skirt and thought it would be super cute to make a shoe skirt! So I got to work on making my own no-sew pinch pleat curtain to hide all our shoes!
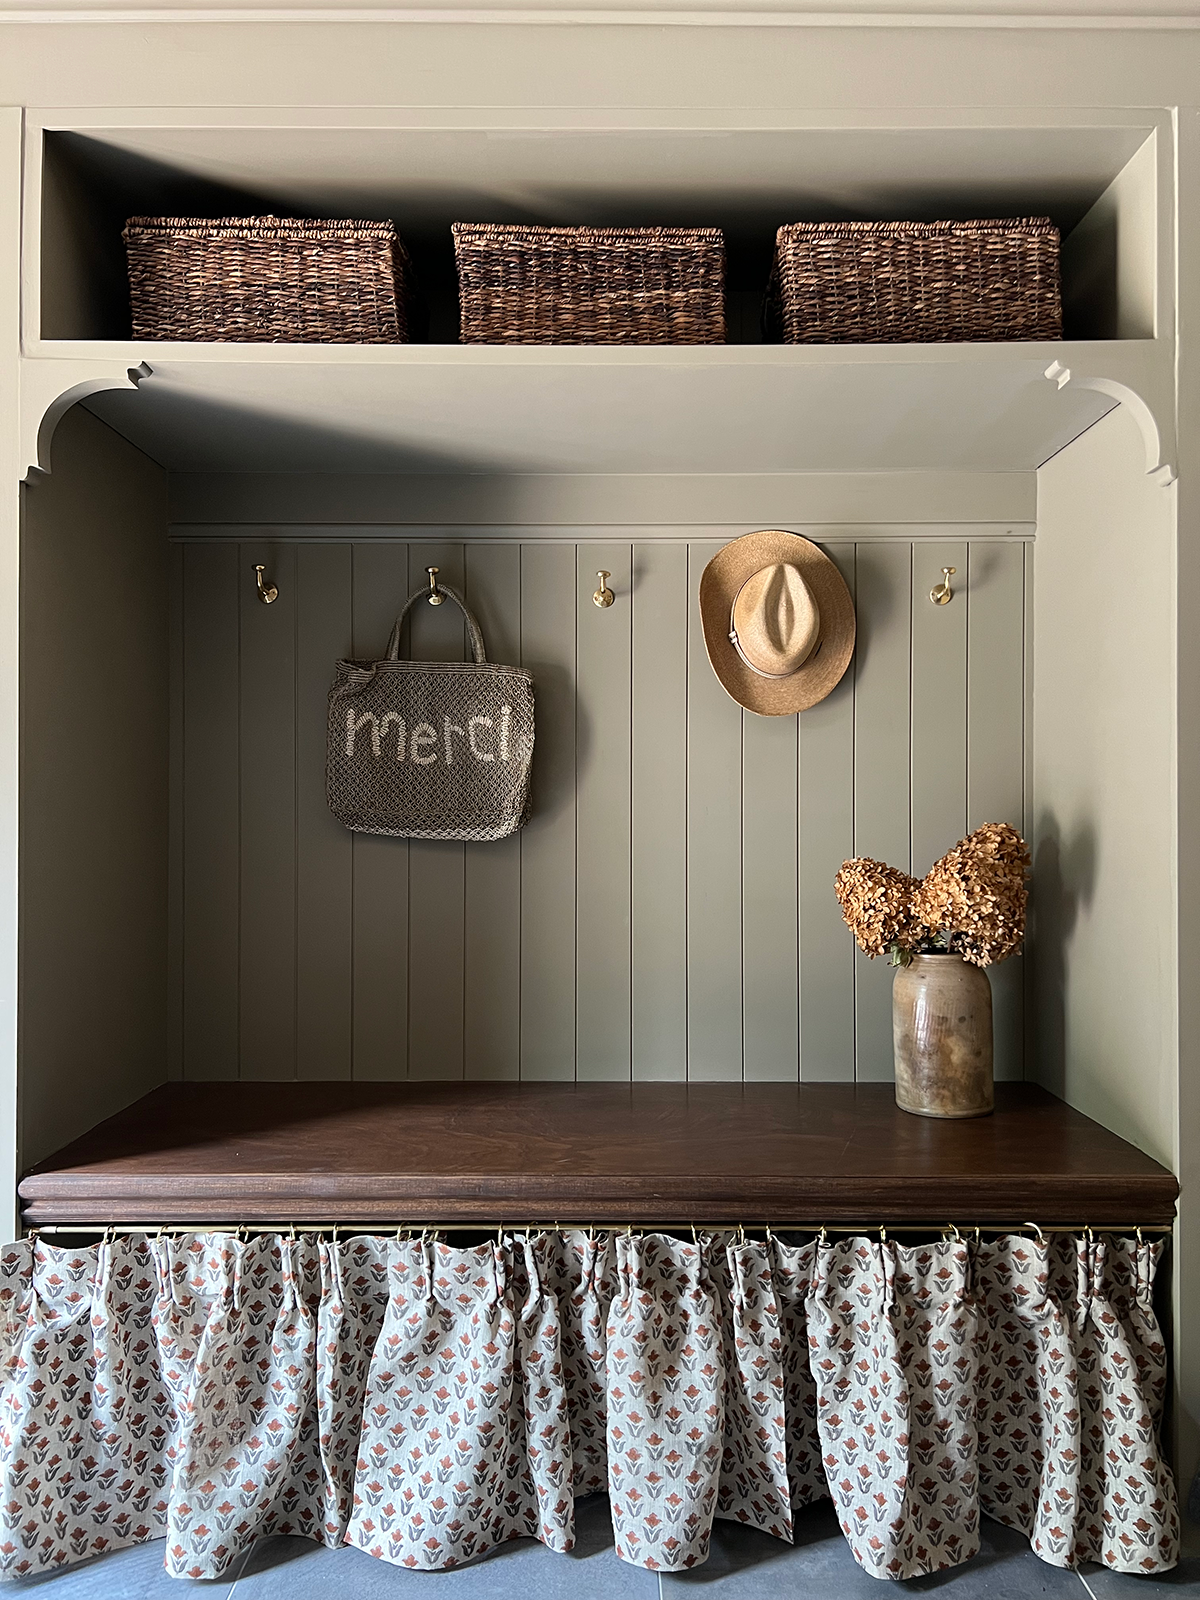
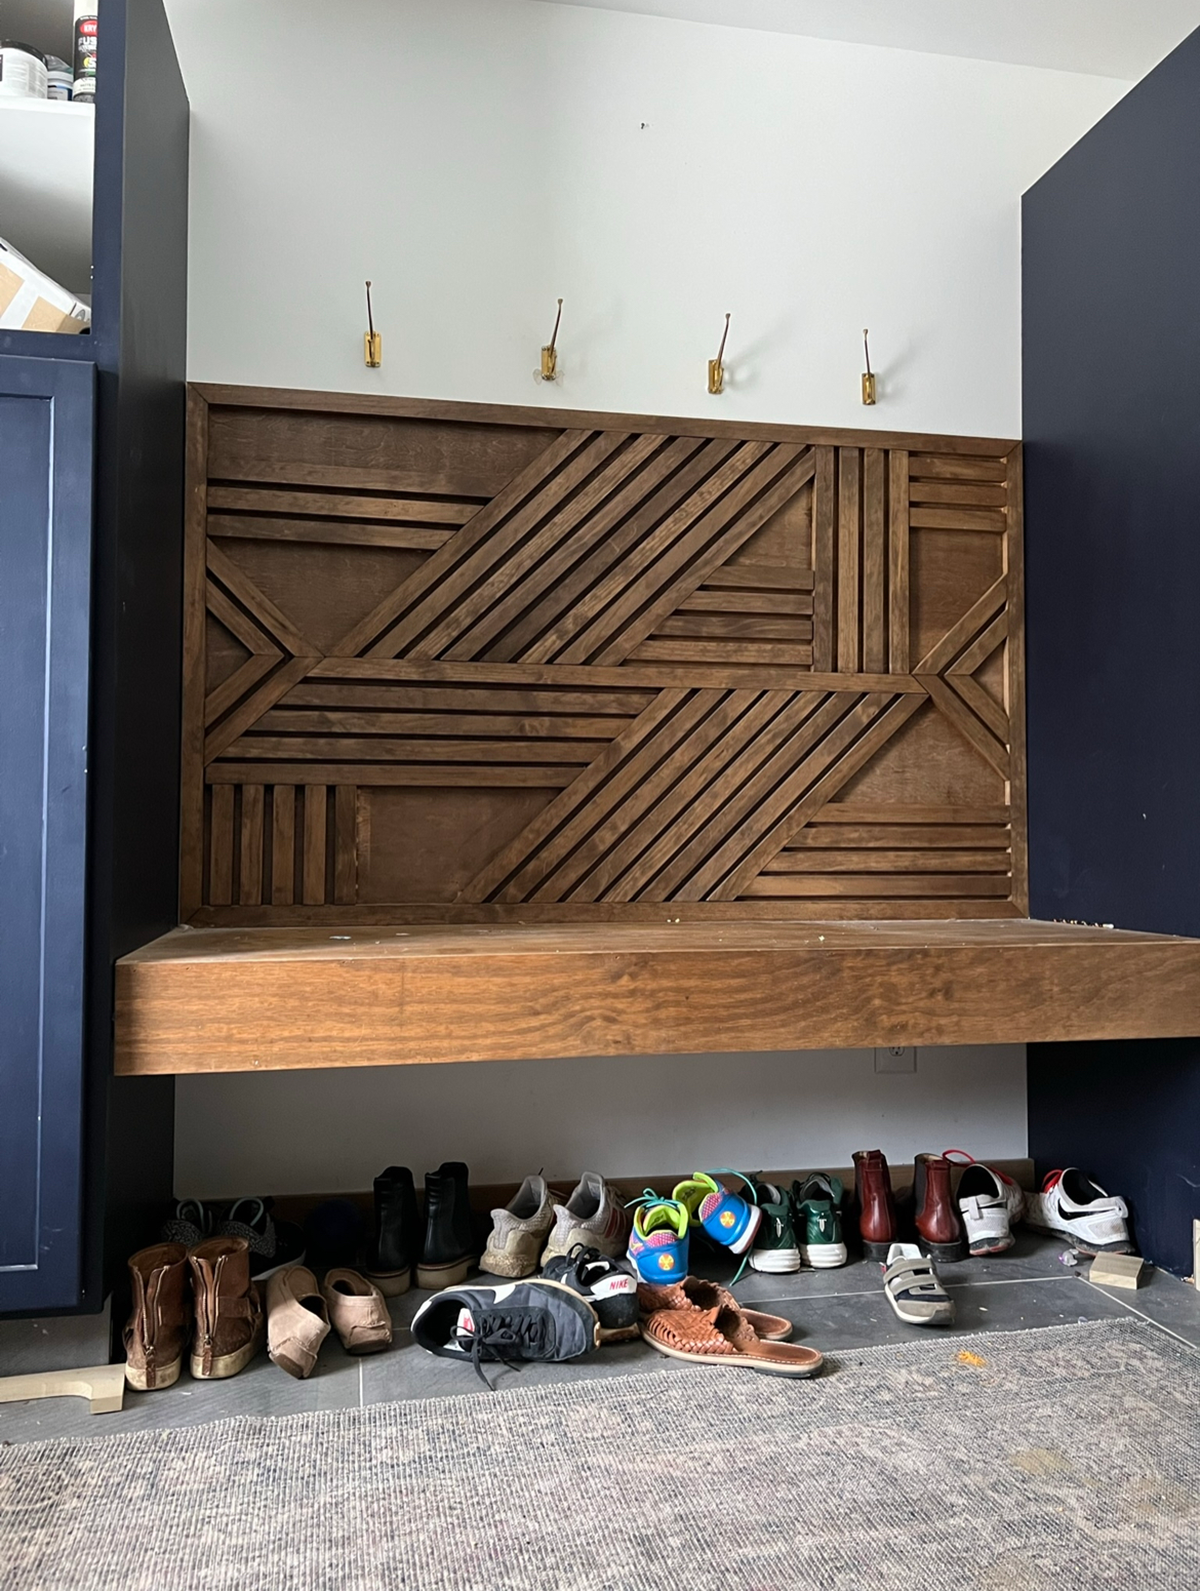
Exhibit A: I’m honestly surprised it took me 7 years to decide to cover this up. We use this room SO MUCH and no matter how hard I tried it was impossible to keep the shoes neat and tidy. I wanted something that was still functional but also pretty and a curtain seemed like a great choice. It would hide the mess but would be easy to pull to the side and get to our shoes when we needed them.
WHY PINCH PLEATS?
If you look at any professional interior designers work, chances are you’ll see pinch pleat curtains. They offer a very tailored and luxurious look, creating a very high end appearance. Most of the time these curtains are custom made and can cost a LOT of money because they require extra fabric, but I was quickly surprised at how easy they were to make myself.
I actually do own a sewing machine but it’s been a hot minute since I used it and by the time I figured it all out again I’d probably already be done with this no-sew method! I’ve used iron-on adhesive before and was super impressed with the results so I was willing to give it a try on these curtains.
MATERIALS FOR NO-SEW CURTAINS
- Fabric (double the length you want your final curtain)
- Pinch Pleat Tape
- Extra Pleat Hooks if needed
- Curtain Rings
- Iron-On Adhesive
I am so in love with the fabric I chose for this project. I discovered these beautiful block print textiles on Etsy and immediately knew I’d be using one of them. They remind me of my DIY Block Print Table Runner I made last year! Once my samples arrived, these this dainty little tulip print was the clear winner. And bonus – I have extra fabric left over so I think some pillows might be in my future 😉
HOW TO MAKE A NO-SEW PINCH PLEATT CURTAIN
STEP 1: MEASURE YOUR FABRIC
You want your fabric to be approximately double the length of the finished size of your curtain. The way the pattern went on my fabric, my length was already pre-determined for me and I ended up making 3 curtains total.
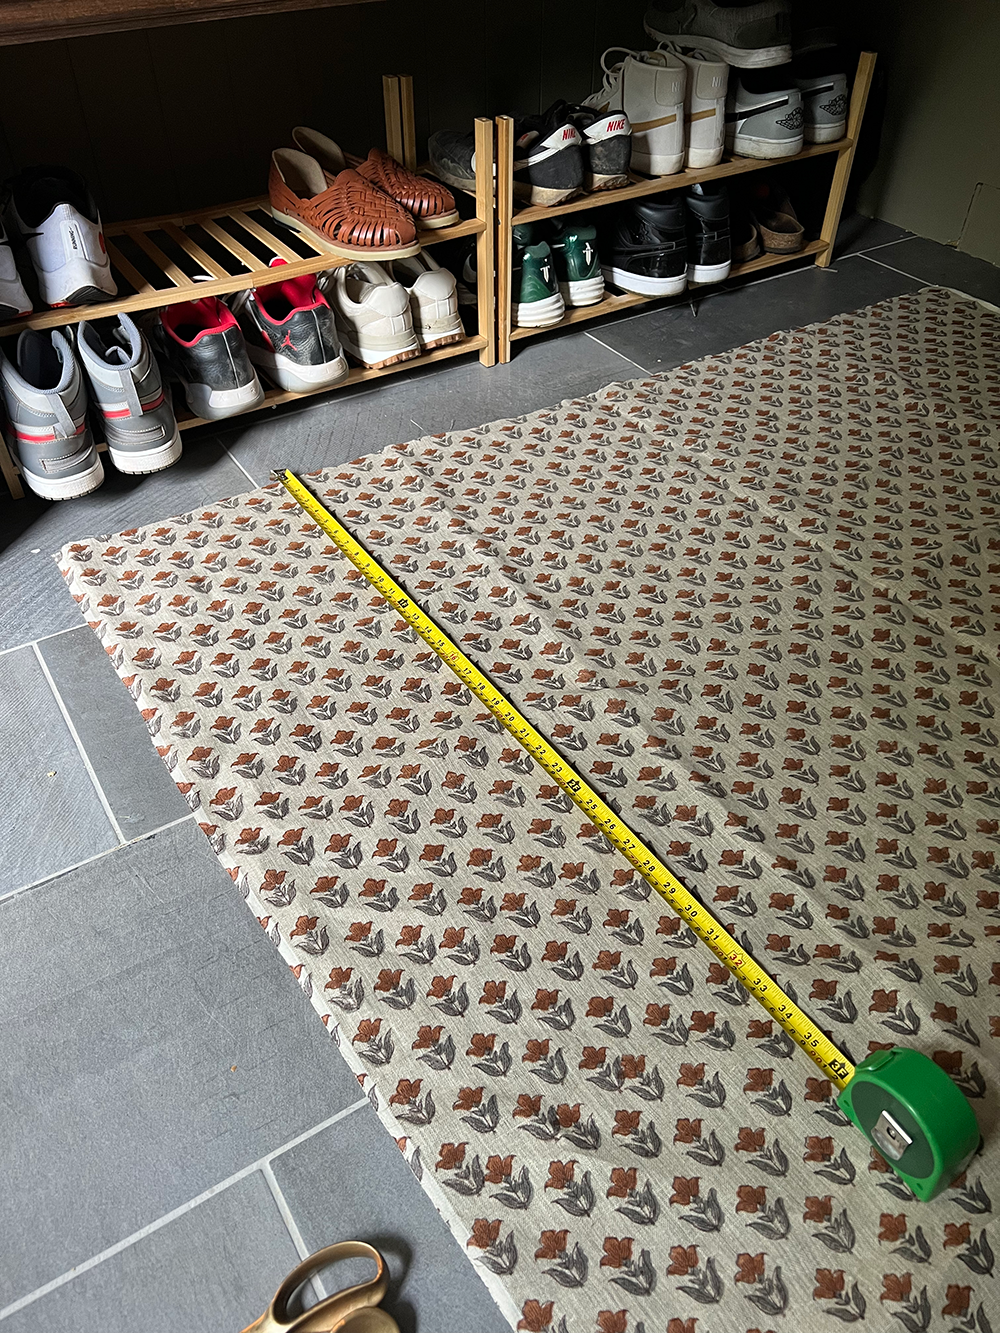
For your height, I suggest cutting the fabric a little longer than you think you’ll need. Then once you hem the sides and top you can hold them up and get a better idea of where to trim it.
STEP 2: HEM THE SIDES OF YOUR FABRIC
Once you have your fabric cut to size, you can hem the sides in approximately one inch. If you’ve never used iron-on adhesive before, it’s super easy! You simply cut a piece to the length of your fabric. Fold your fabric over it, and then use your iron to make it stick!
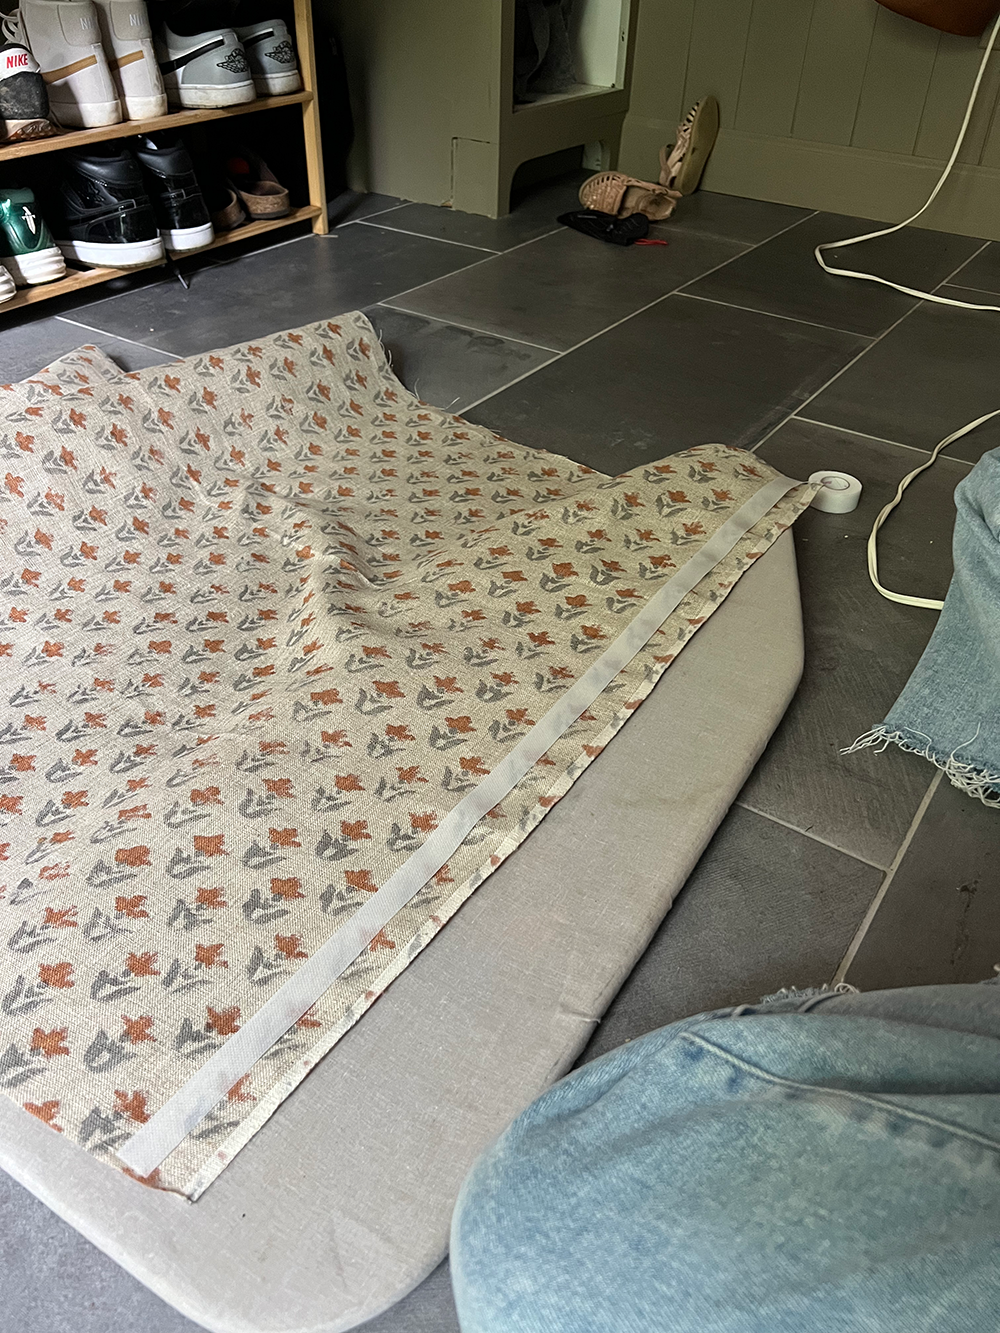
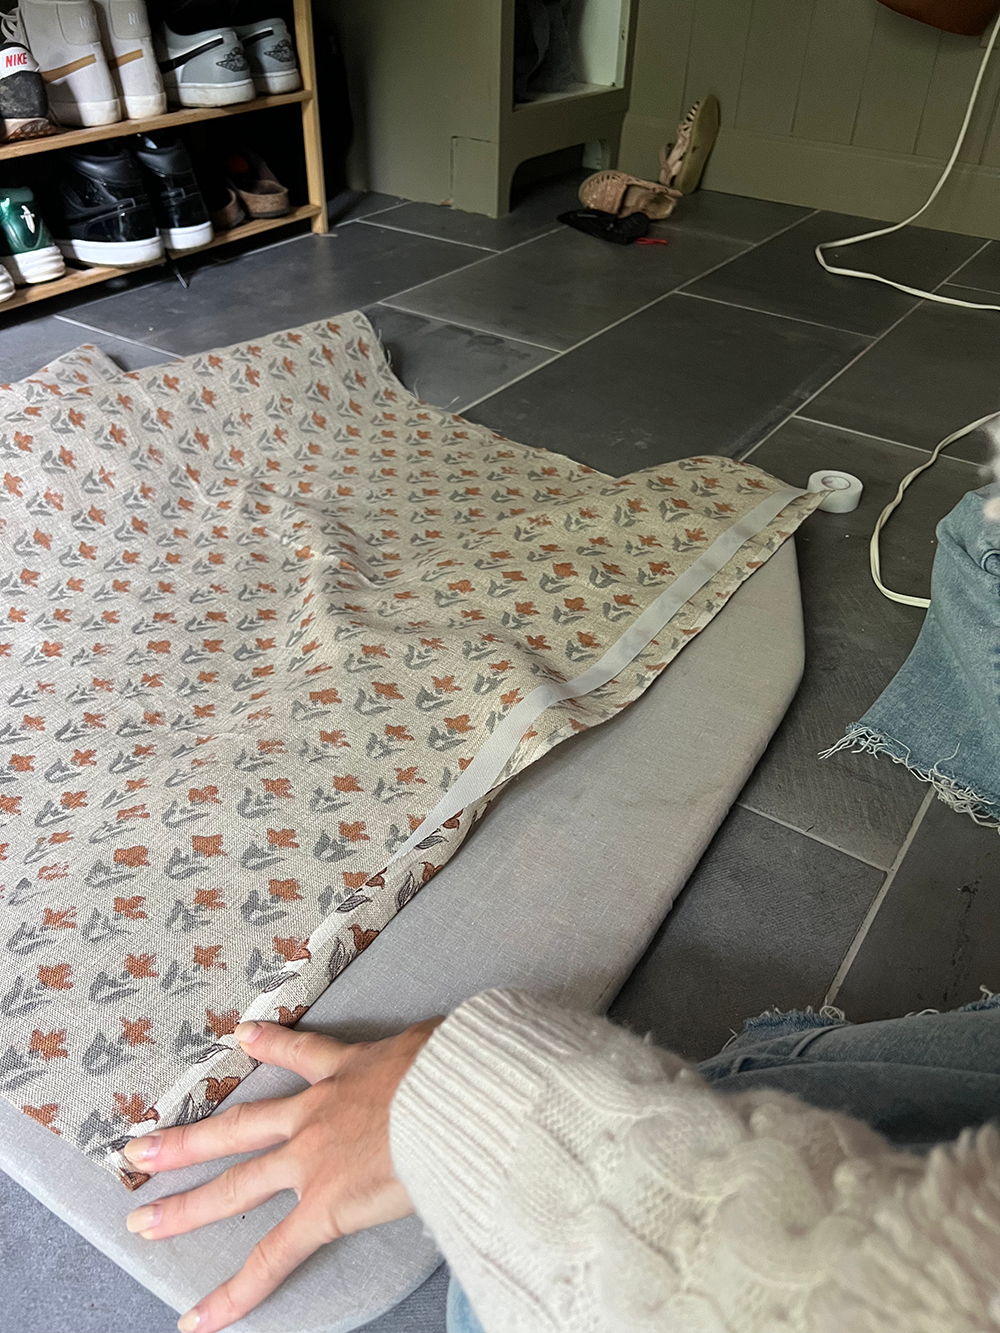
The heat from the iron melts the adhesive and binds the fabric together. There are different brands of adhesive so make sure to read the directions for yours! Mine needed to be pressed for about 10 seconds a section on the back. Then I flipped it over and pressed it again for a few seconds per section.
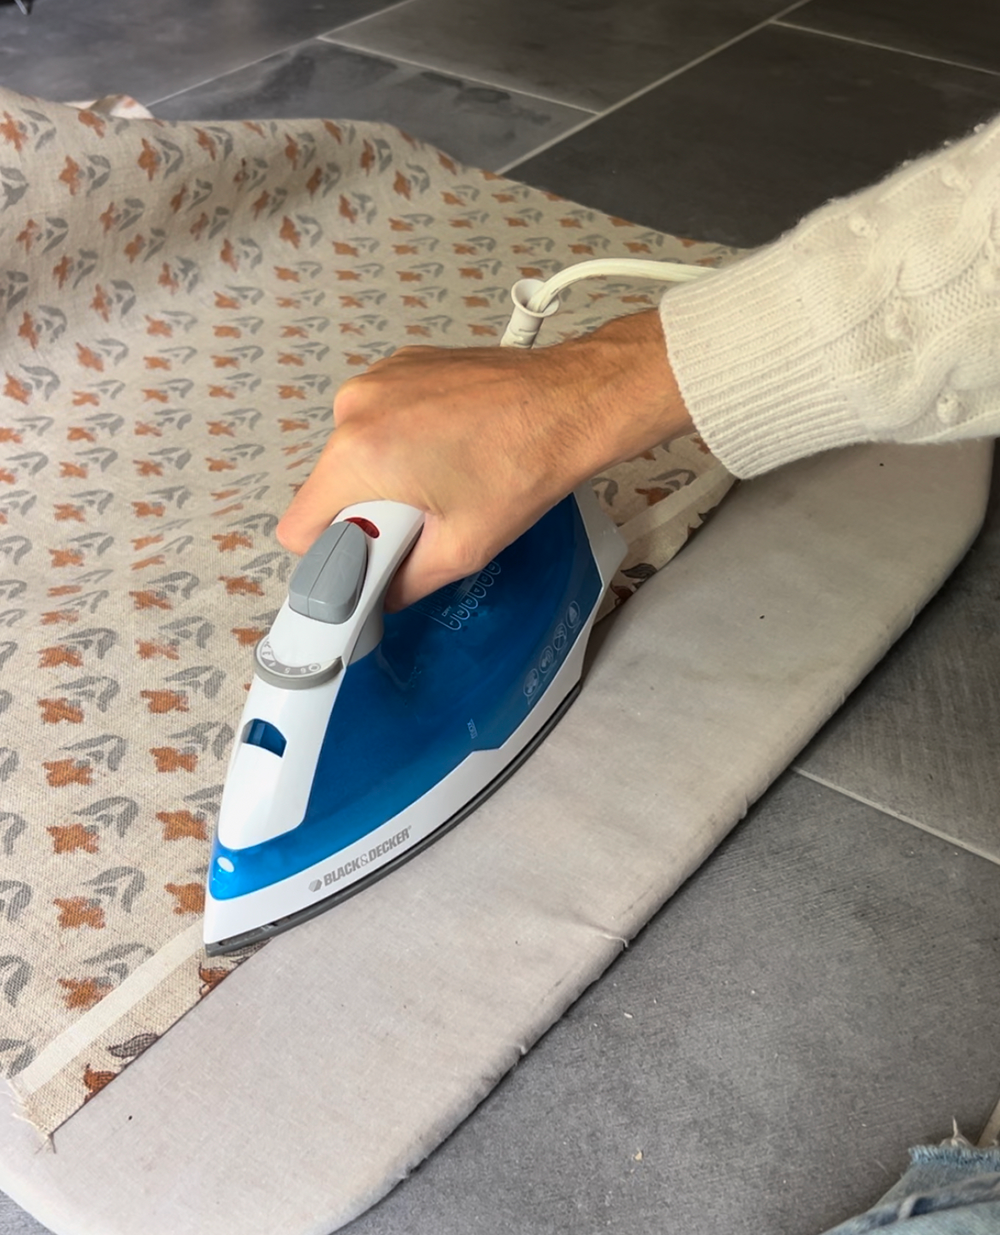
The iron-on adhesive created a permanent bond without having to sew! Easy peasy!
STEP 3: HEM THE TOP OF YOUR FABRIC
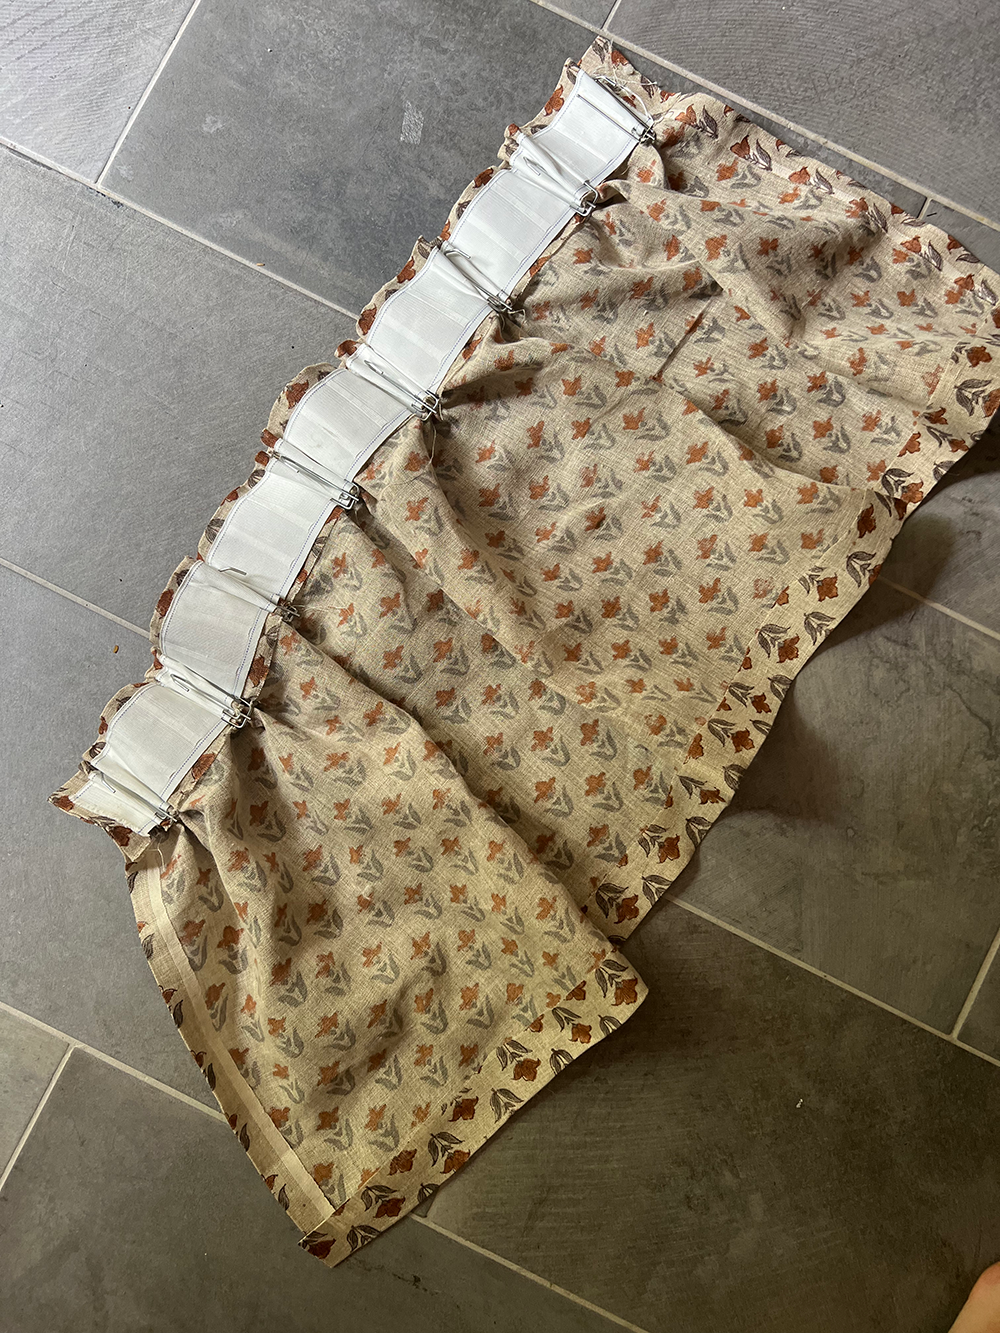
The hem at the top of your fabric is going to be a little wider than your sides because this is where your pleat tape will go. Fold your fabric over and place the pleat tape on top so that you have about 1/4″ space on top and bottom (1/2″ total).
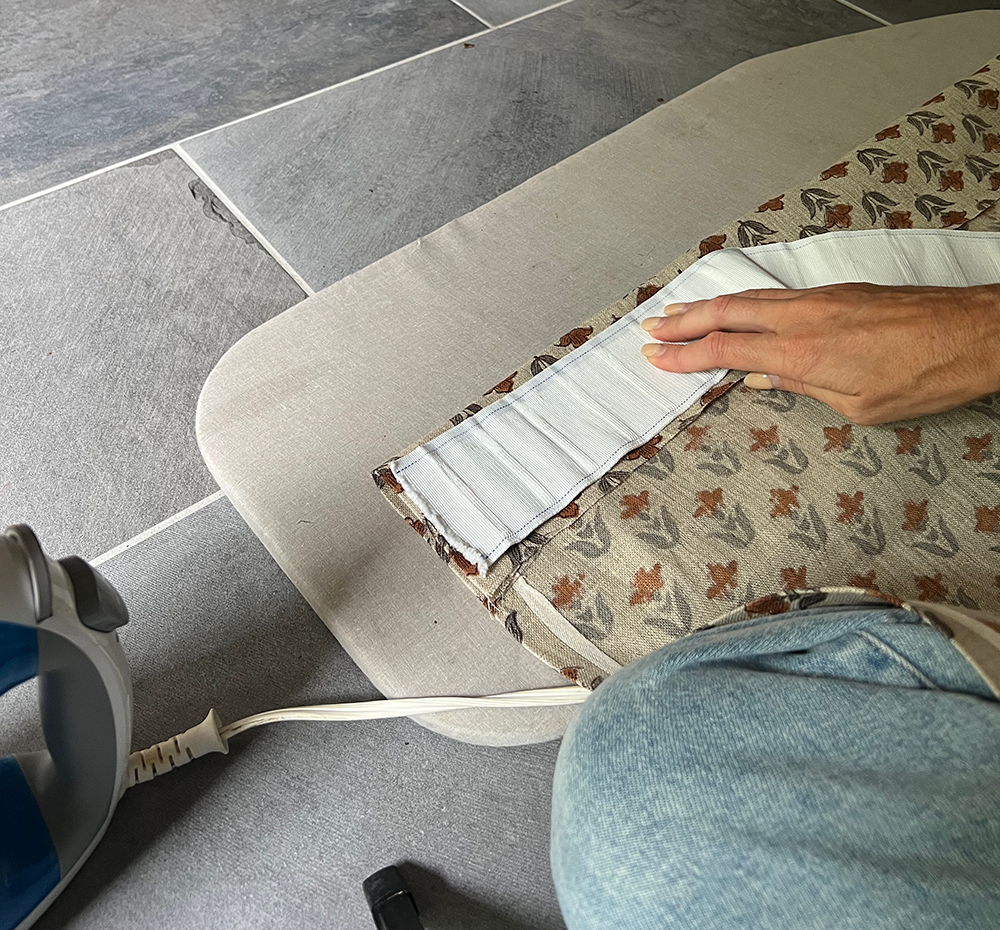
Remove the pleat tape and fold the fabric back down. Place two strips of adhesive the length of your fabric, fold the fabric over it and iron it down.
STEP 4: IRON ON YOUR PLEAT TAPE
To attach the pleat tape do the same thing as above, placing two strips of adhesive over your seam. Place the pleat tape on top and iron it in place.

STEP 5: HEM THE BOTTOM OF YOUR CURTAINS
At this point, you can hold up your curtain and get a better idea of where you want them to fall. Mine end about 1/4″-1/2″ above the floor. You may want yours to gently drape across the floor or hang slightly above. Either way, I found it easier to get my measurement at this point in the process. I even attached one of the hooks and rings and held it on the rod.
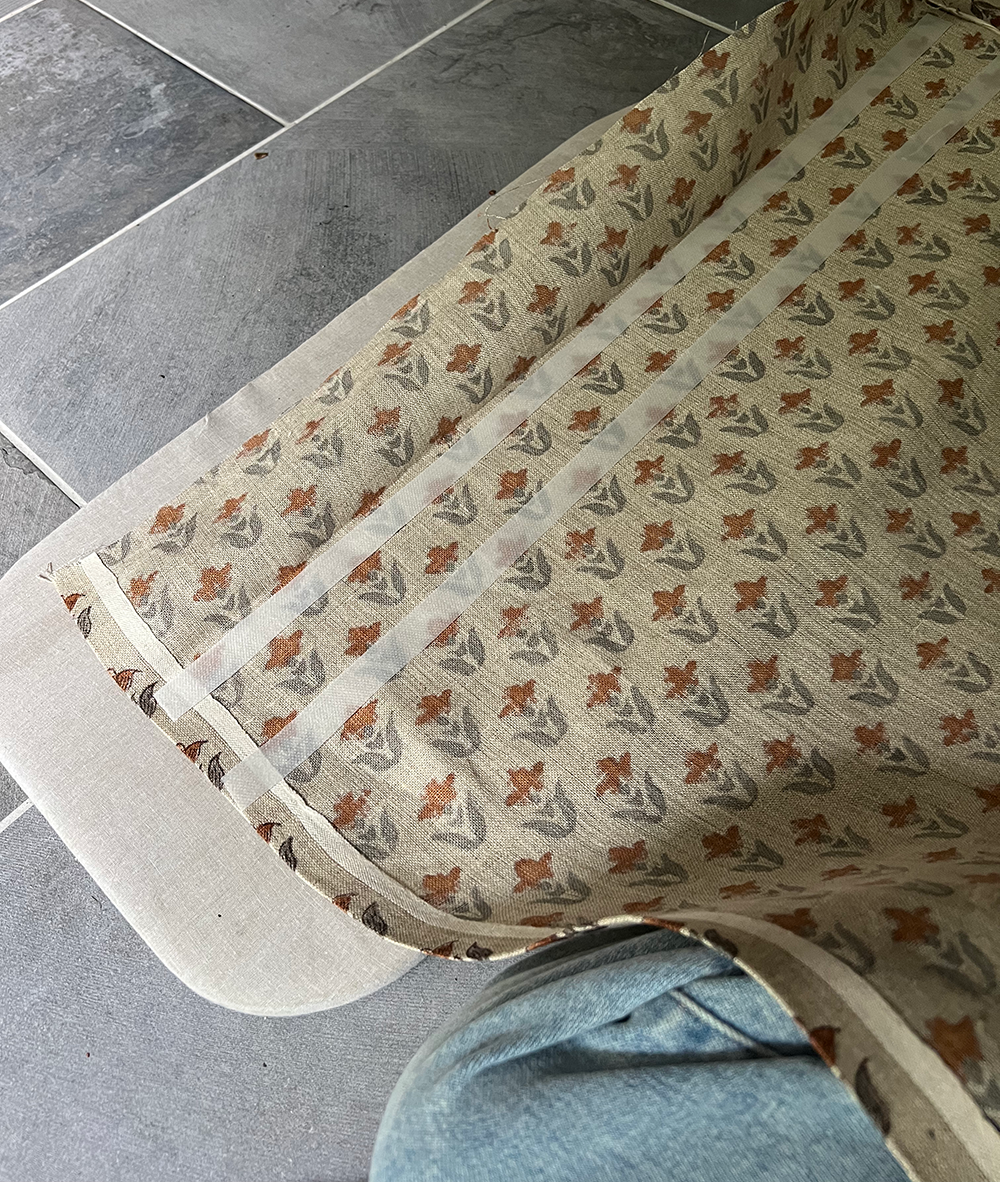
STEP 6: INSERT YOUR PLEAT HOOKS TO CREATE YOUR PINCH PLEATS
This was honestly the hardest part of this whole process. These guys are stubborn and you definitely need a little elbow grease to get them to go in.
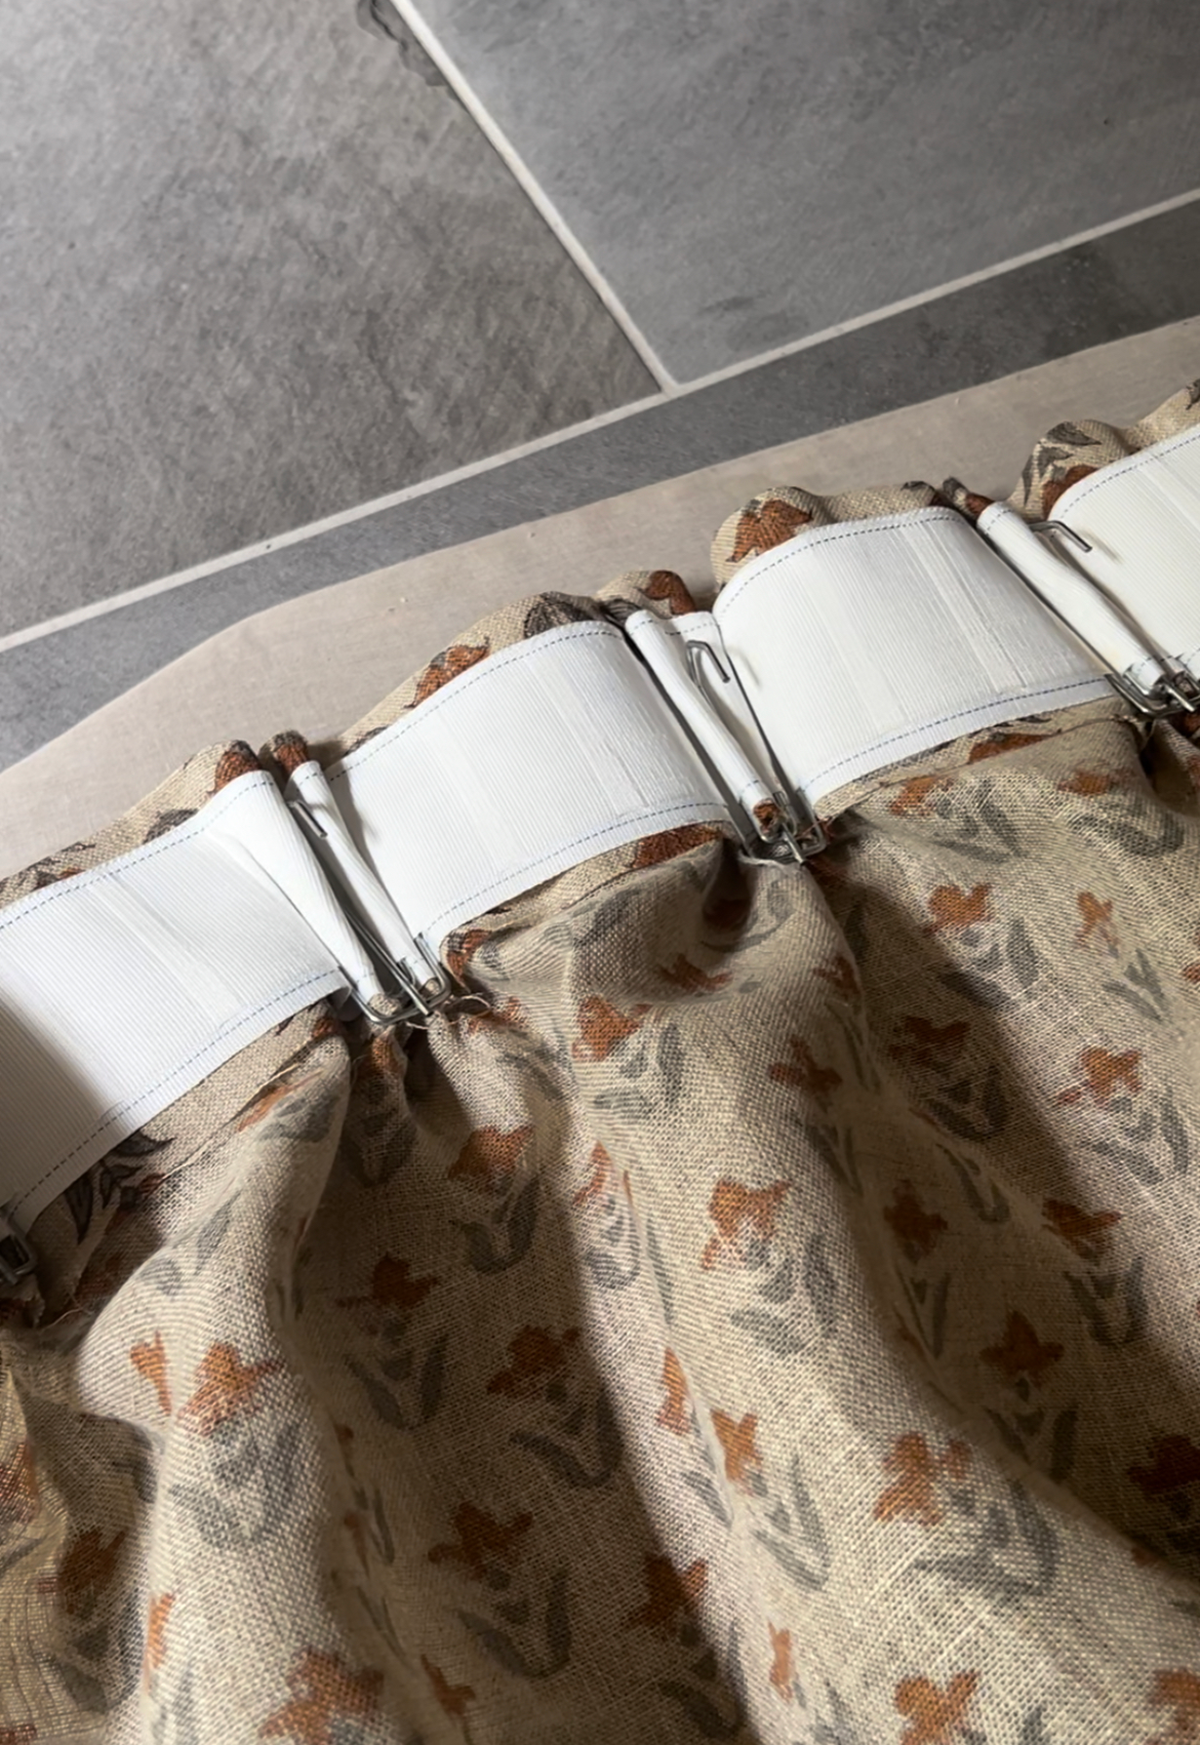
You have a few options here – you will see that your hooks have 4 prongs on them. To get the classic pleat pinch look, you’ll want to insert all 4. You can also just insert 2 or 3. Play around with them and see which you like best!
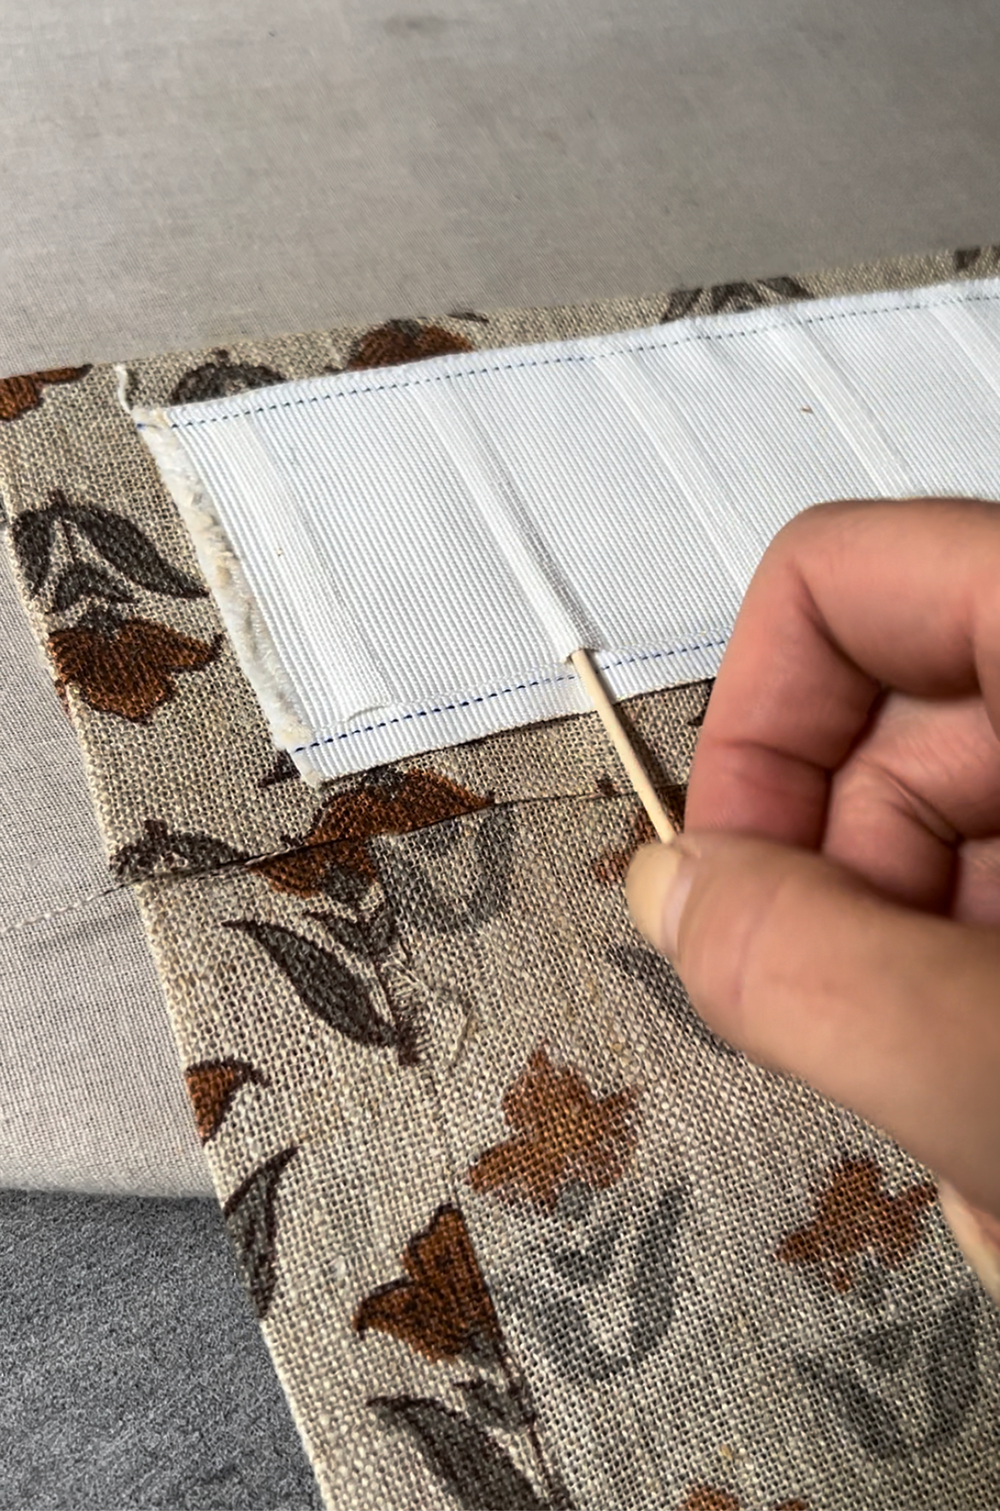
I decided to go with 4 and I have some tips to make it a little easier for you! The first tip is to use a toothpick to help open up the slits on the pleat tape. Especially after ironing it to your fabric, the slits are going to be very flat. Just insert a tooth pick and wiggle it back and forth a bit. If you still have a stubborn slit, you can keep the toothpick inserted while you insert the prong. Then just slide the toothpick out.
The second tip is to insert the middle two prongs first. Then insert the two outer ones. This made it much easier than trying to do all 4 right in a row.
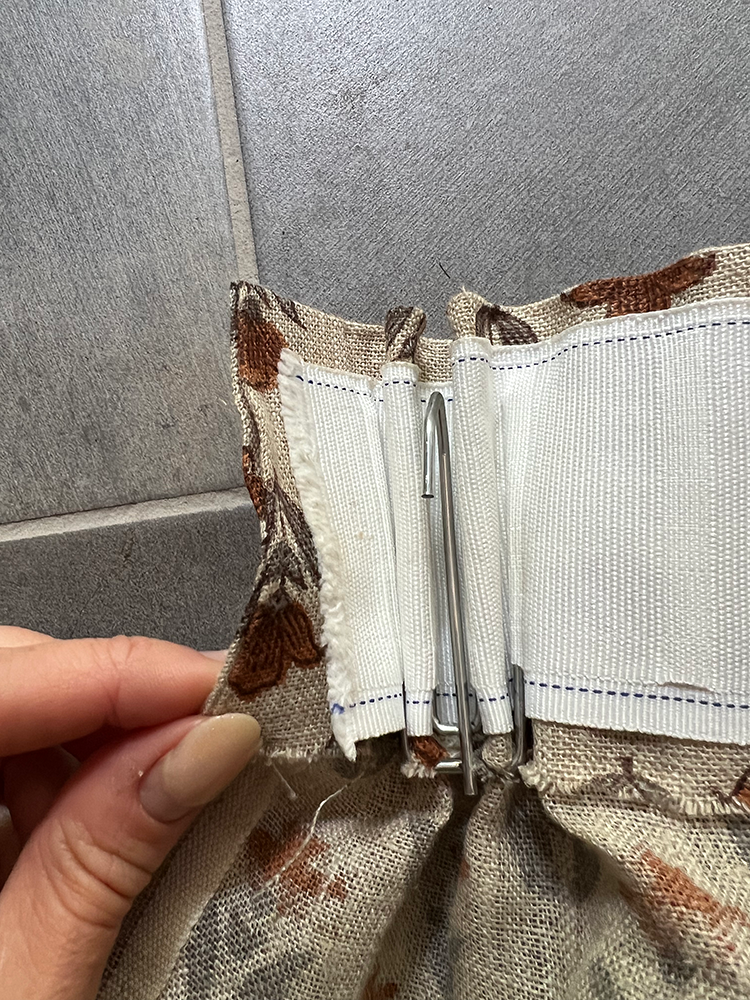
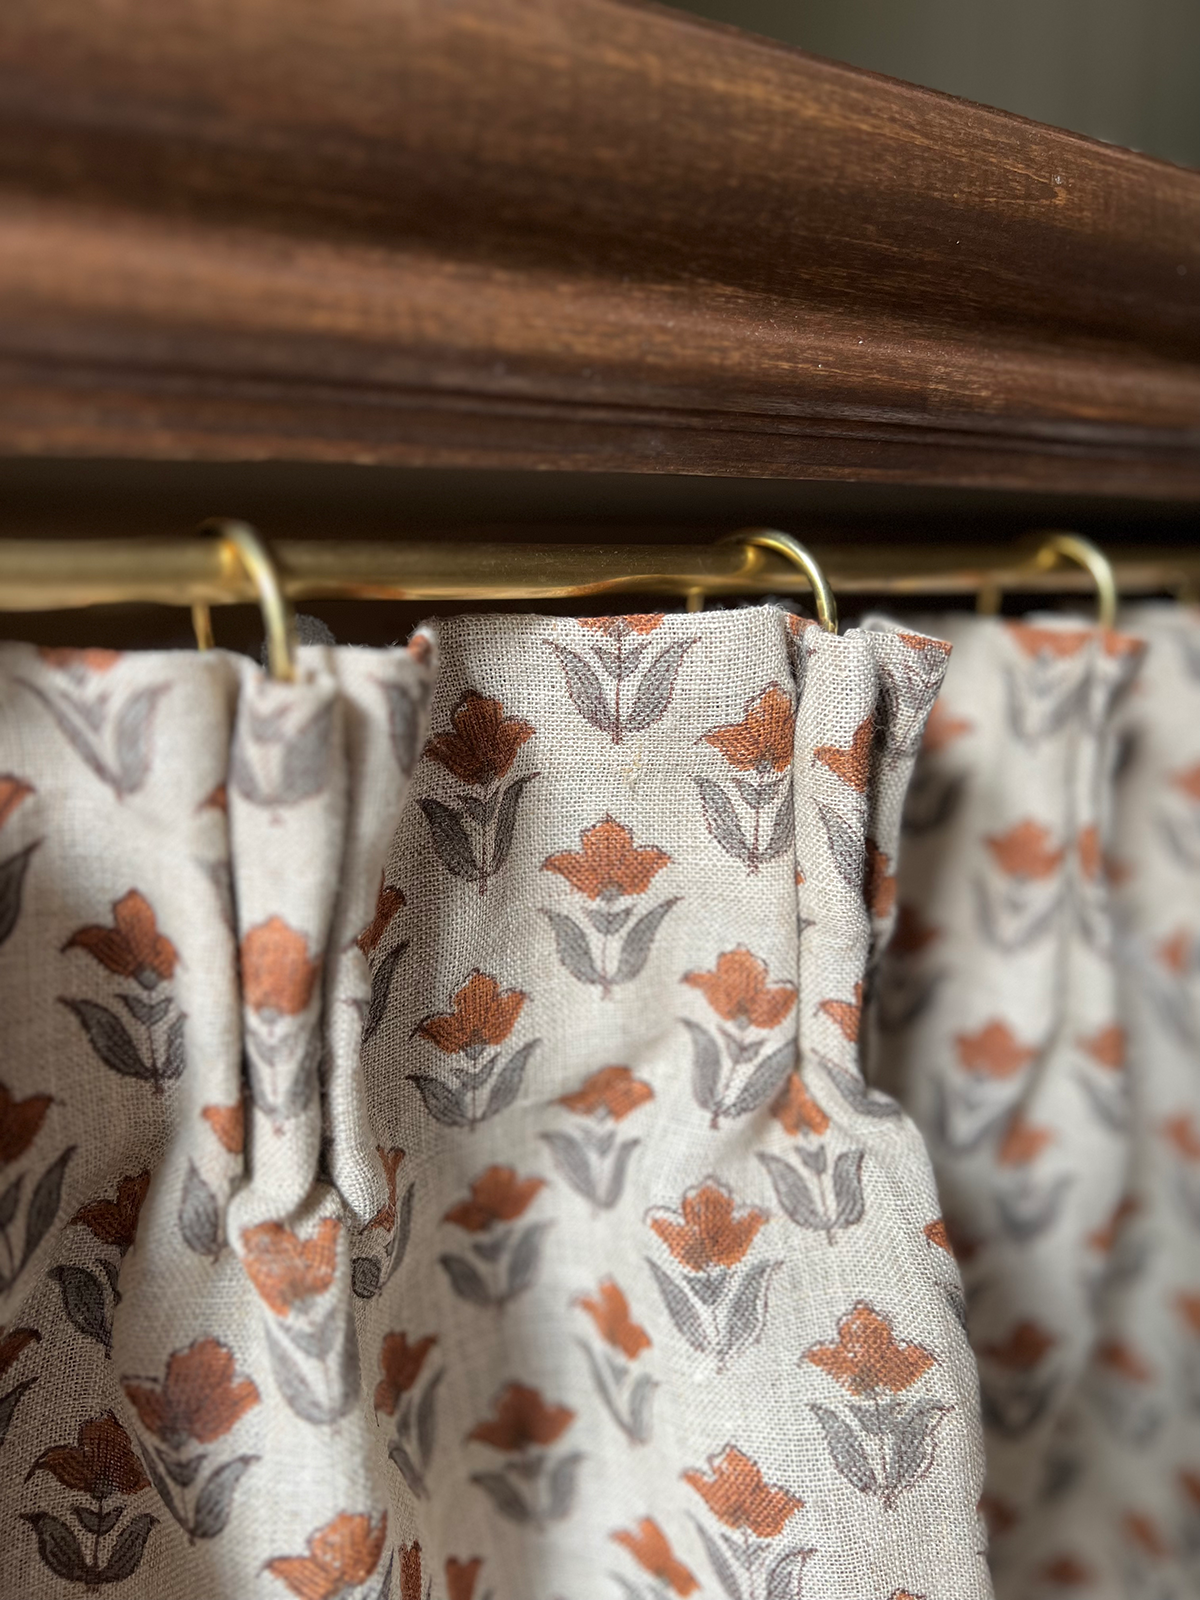
I was so excited when I turned my fabric around and saw my first pinch pleat! It looked so good! You may need to do a little adjusting with the fabric to make sure it’s folded the right way, but for the most part, the hooks will do all the work for you.
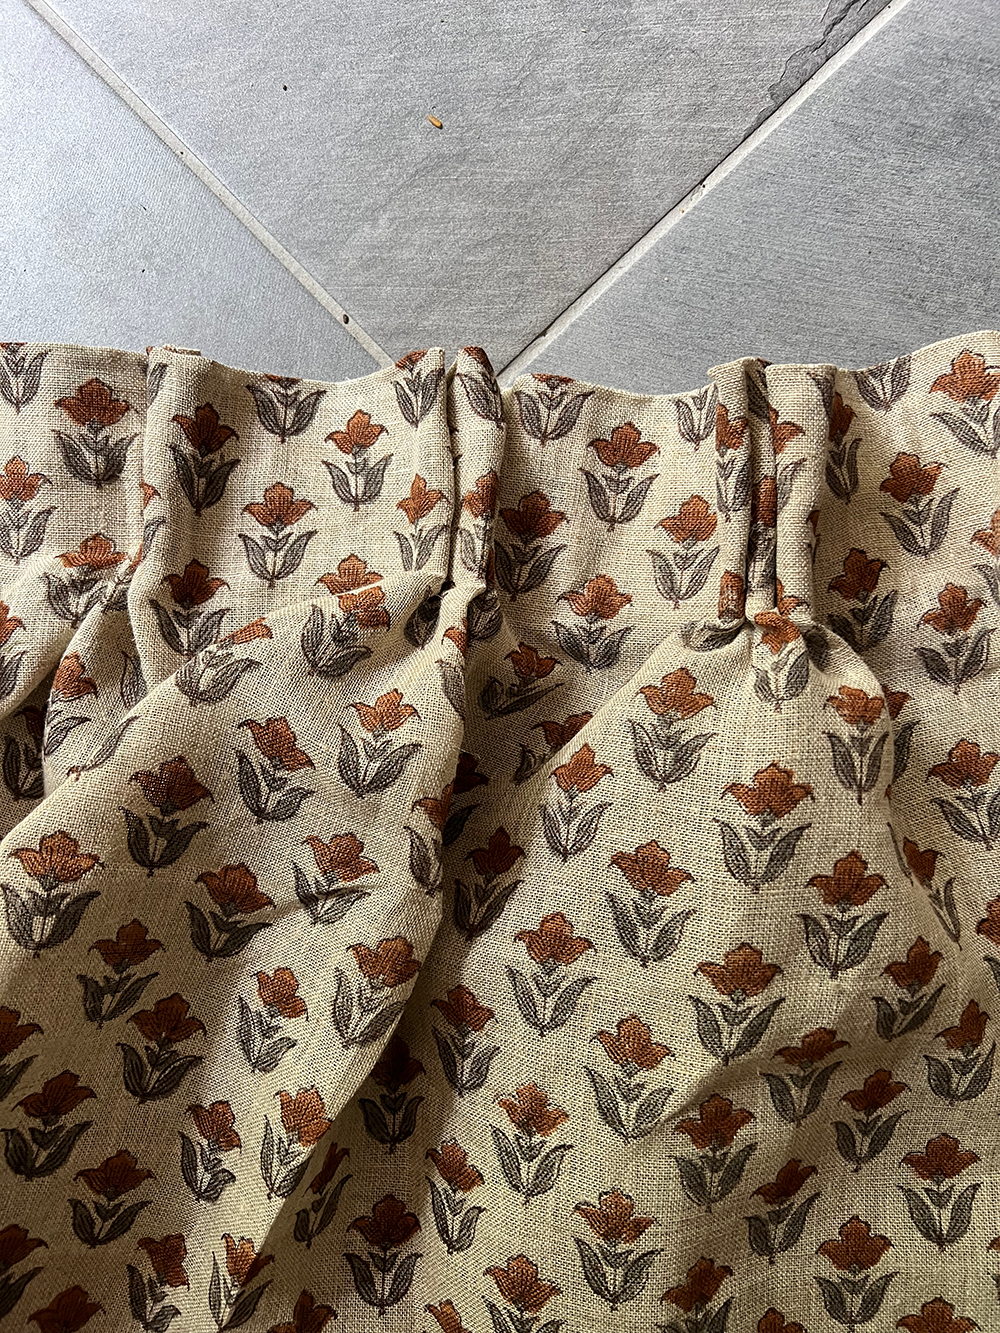
You can also decide how much room you want to leave between each hook. If you want your pleats closer together, do a smaller amount. If you want them farther apart with more fabric in between, then you can space them farther apart. I went with 2 empty slits between each hook.
STEP 7: HANG YOUR PINCH PLEAT CURTAIN
Once all your hooks are attached, you can hang it up! With the type of rings that I got, I suggest putting the rings on the curtain rod first and then hooking them onto the curtain.
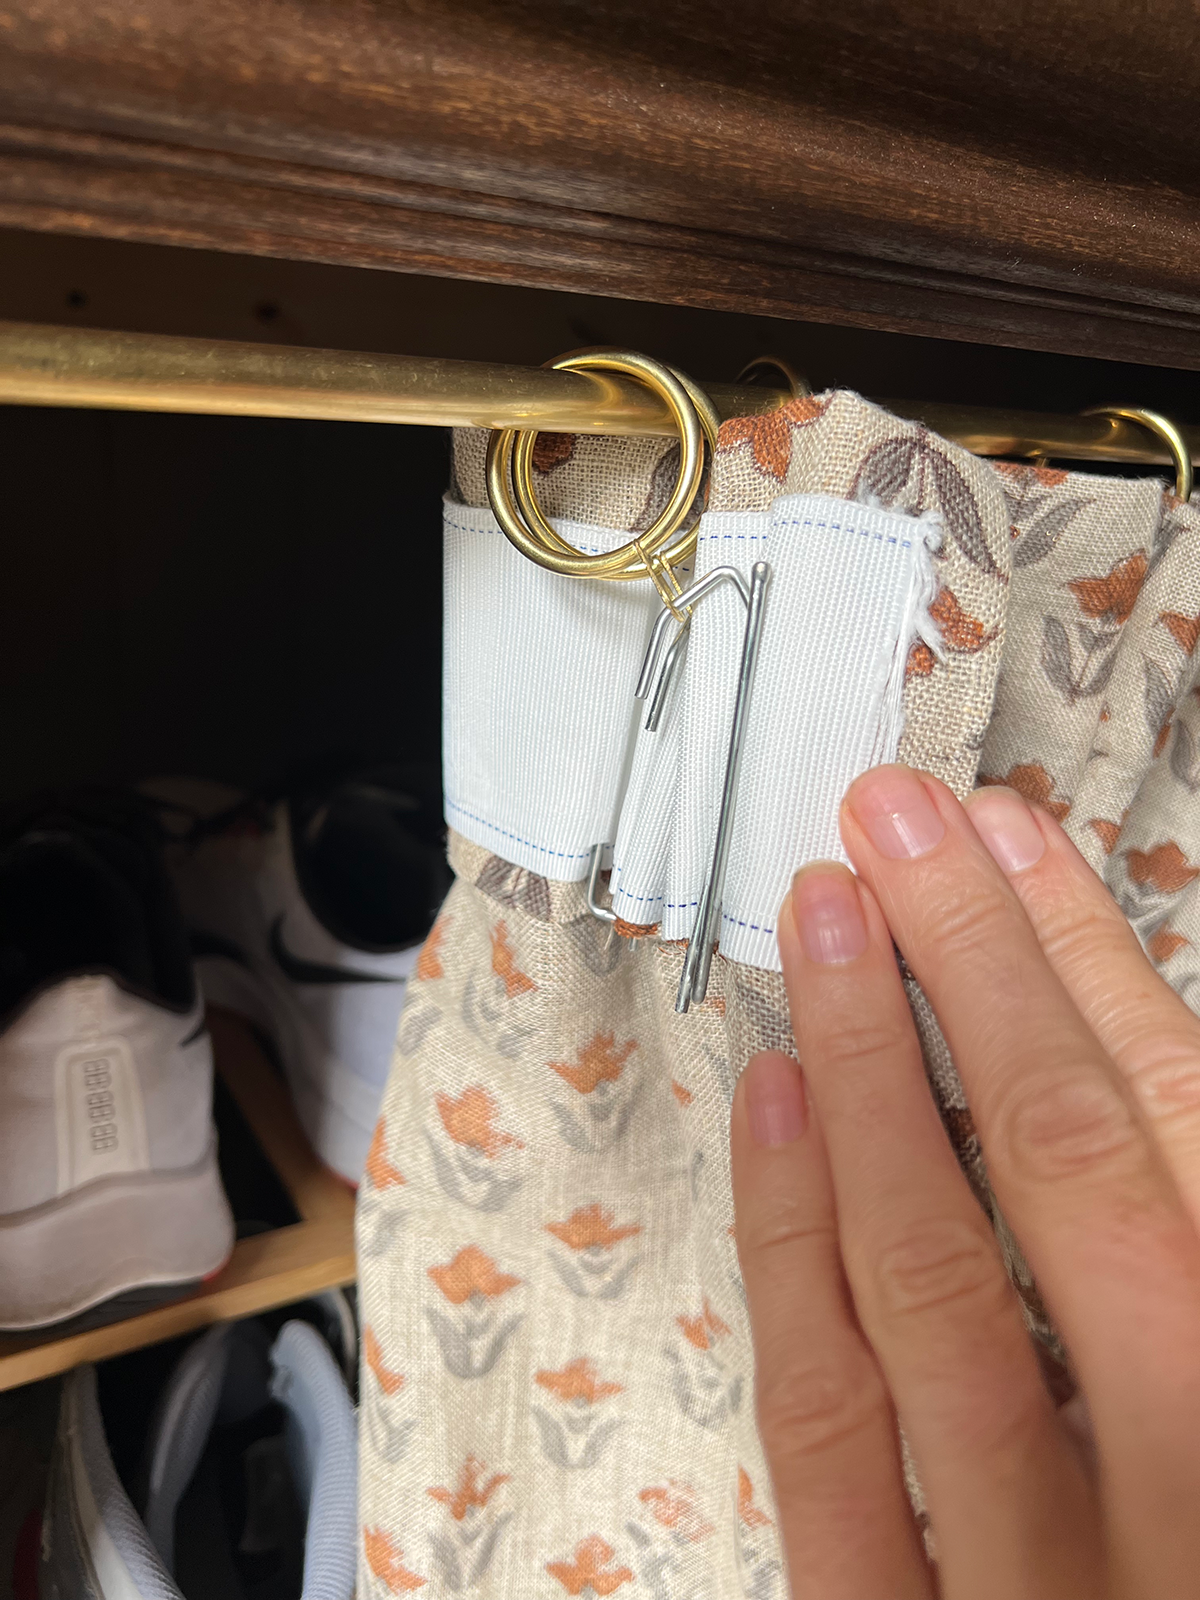
I got the rod custom made from Pepe and Carols who also made the brass kitchen rail in our kitchen. The finish is unlacquered brass and the rings I purchased were a pretty close match to that!
I’m not going to lie, I was super impressed with myself and how well this turned out! I kept putting this project off because I was scared it was going to be hard and take a long time. Making my first curtain probably took an hour and half just because I was figuring everything out and the second two were definitely under an hour.
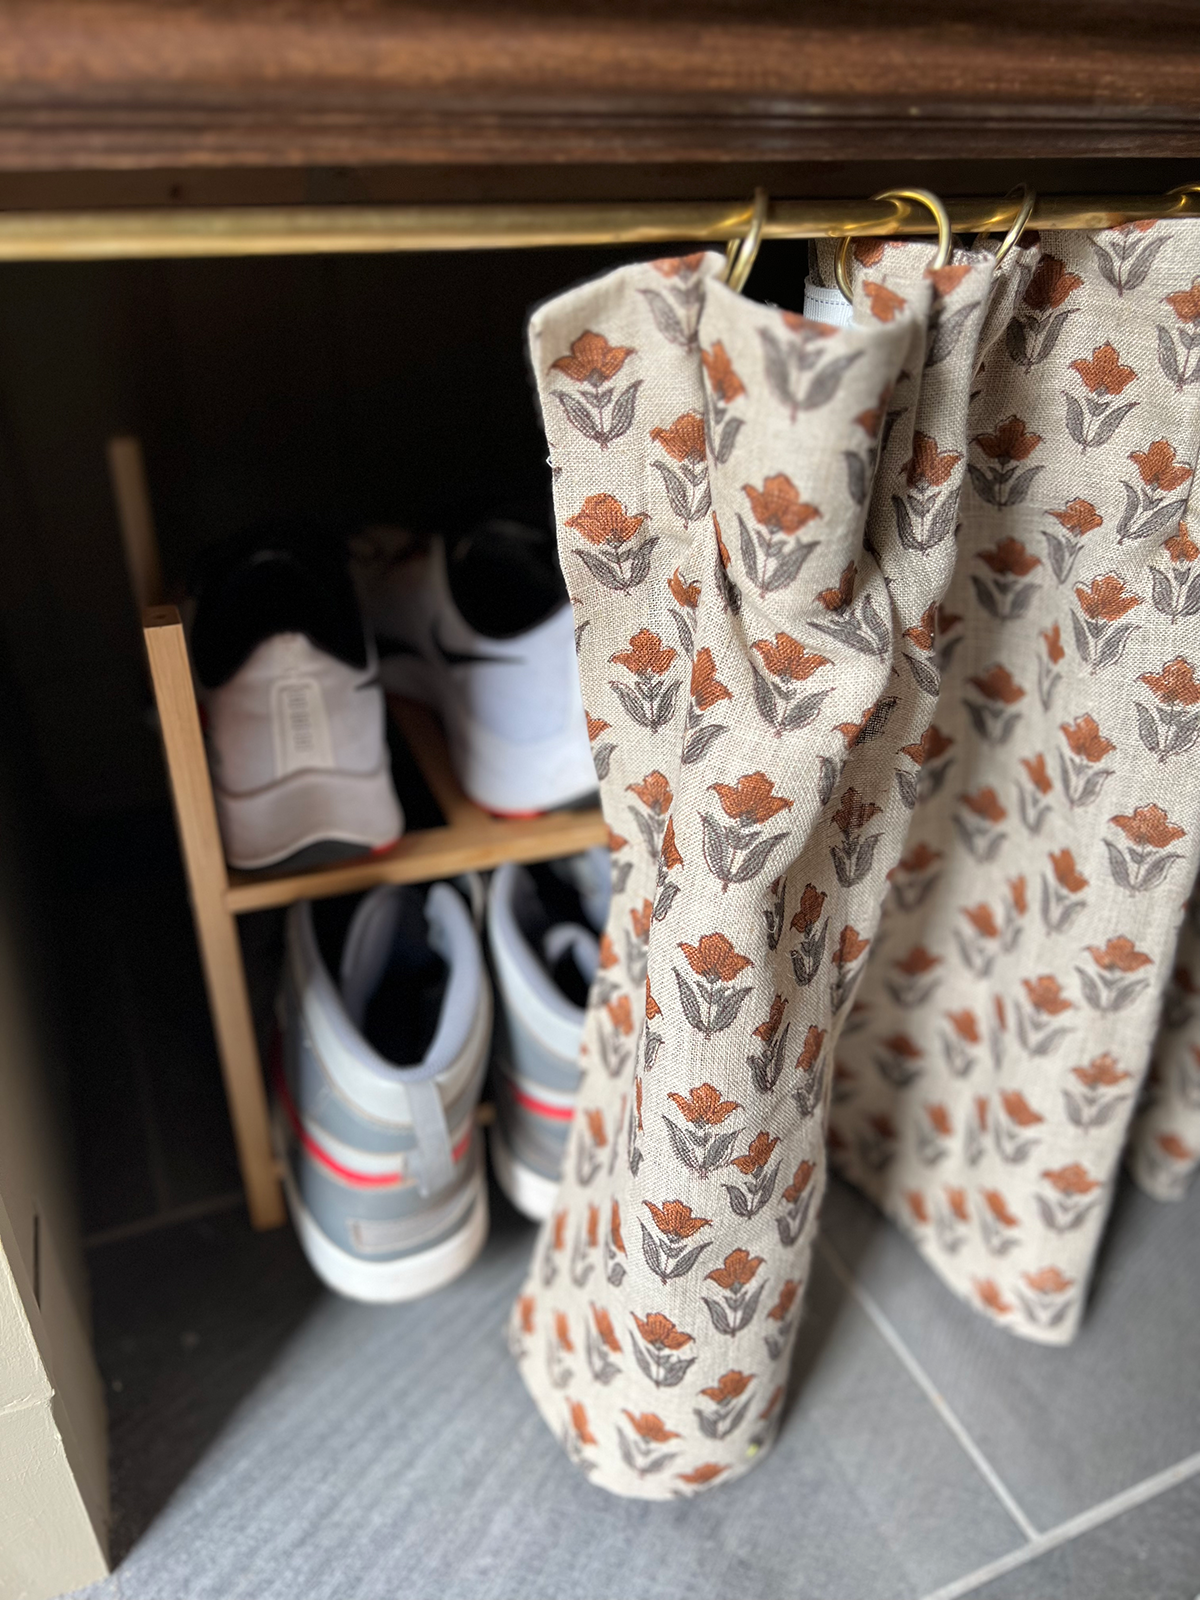
And now we have the perfect solution to hiding all our shoes!
My pinch pleat curtains are a little more whimsical and flowy, but if you prefer a more defined and crisp look then you can iron your pleats.
What do you think? Will you try making your own no-sew pinch pleat curtains?


Cici Haus
Love that fabric so much!
brepurposed
Isn’t it so beautiful?! Her shop is full of the best prints!