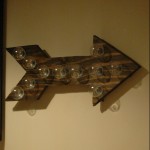
It’s time for another Monthly DIY Challenge! Our item this month was clear ornaments which have been ALL over blogland, so it was hard to come up with something that hasn’t already been done. Right away though, I knew I wanted to make something other than an ornament, and ultimately decided on a Christmas Marquee Sign!
this post contains affiliate links
CHRISTMAS MARQUEE SIGN

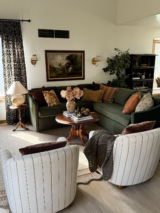
One thing missing from my holiday decor was an oversized Christmas print. I LOVE the ones seen at Lindsay Letters and House of Belonging so I figured I would try my hand at making one myself!
I bet you’ll never guess what my sign is made of 😉
Here are the supplies you need:
:: Foam Core
:: Kraft Paper
:: Balsa Wood Strips (found at Michaels)
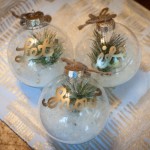
:: Clear Ornaments
:: White Paint
:: Battery Powered Christmas Lights
That’s right, my sign is made from foam core. It’s SO lightweight plus it was super cheap to make!
Step 1
Glue your kraft paper to your foam core.

This glue seriously amazed me. It works like a charm, but be careful because it’s STRONG. As soon as my paper hit the foam core, it was pretty much stuck on there.

Step 2
Stain your Balsawood Strips. These things weigh next to nothing which is awesome!

Step 3
Glue your strips to the foam core. I just used some super glue for this.

Step 4
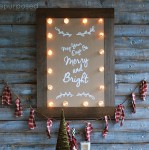
Lettering! I designed my words in Illustrator using the font Cheddar Jack and then printed it out on 3 separate sheets. I used a transfer method trick from my friend Nicole over at Meet the Bs that worked amazingly!
First you want to cut around your letters and shade the back of the paper with a pencil. Yes I used our cheese platter that was still out from our xmas party the night before as my flat surface 😉

Next place your letters on the sign where you want them and outline each one with your pencil. Make sure to press hard!

You should be left with this:

I really wish I had awesome hand writing and could just free hand this, but that is just one thing I was not given. So this works perfectly for me!
Step 5
Paint! Fill in your outline with paint using a very fine tip paint brush.
Step 6
Make your holes for your ornaments. I used a pencil initially and then used some scissors to make them bigger.

Step 7
Pop in your ornaments and attach the lights! I got mine from Hobby Lobby and they were half off. Boo ya!


And of course I had one more ornament on my sign than there were lights so I had to use two sets. That would happen to me. And that’s why the back looks like this:

Oh well, no one sees it anyway 😉
To hang the sign, I simply glued a block of wood onto the top and then nailed in a little frame hanger. You could just as easily keep this free standing and not worry about that step!
I’ve been dying to make my own marquee sign and am in love with how this one turned out! Clear ornaments are the perfect alternative to light bulbs, plus they’re plastic 🙂


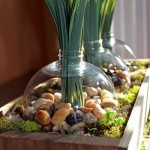
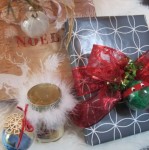
Don’t forget to check out my post on my little red humidor table and be on the look out for a tutorial for that flannel tassel garland seen in my photos!
Be sure to check out all the other amazing projects from my bloggy friends below 🙂
Have a fabulous day everyone!


thatphotoboothrocks.com.au
Yes! Finally something about photo booth.
Kyla @HouseOfHipsters
Clever, clever, clever! This turned out great. The entire vignette is beautiful. Thanks for linking up at Found & Foraged!
brepurposed
Thank you Kyla! Love partying with you guys 🙂 Have a fabulous Christmas!
Jamie | anderson + grant
Super fabulous, as always! Love your idea of the sign and I totally ADORE the red table and your tree. The entire display is perfect. I’m including this post in the features on my blog tomorrow at our party. Thanks for always linking up with us! Merry Christmas!
brepurposed
Aw yay, thank you so much Jamie! Hope you have a great night 🙂
Michelle from Weekend Craft
Bre you are so brilliant using the clear ornaments as lights! Just had to feature this on Creative Spark Link Party this week. Hope you stop by today to link up and enter our giveaway! http://bit.ly/1GNpmUs
brepurposed
Aw thanks so much Michelle!!
Krista @ the happy housie
Okay, this is unbelievably cool. Love it! Featuring you at WIW this week- thanks for sharing it Bre!!
brepurposed
Yay! Thank you so much Krista 🙂
Gilly @Colour Saturated Life
I love this! It is a beautiful vignette you have created and I adore that little red table!
brepurposed
Thank you so much Gilly!
The Salvage Bureau
Adorable! I am planning a lumberjack party for January, and this would be perfect. Thanks for the great idea.
Lacey
brepurposed
That sounds like so much fun! Thanks for stopping by 🙂
Heather Grow
Another great project. I love all the little “cheats” and tricks that you shared. I’m always super jealous at bloggers who have amazing handwriting. Thanks for sharing your secret.
brepurposed
Thank you heather! Good hand writing is definitely not something I have, so I’m always looking for tricks! thanks for stopping by 🙂
debbie
Grateful for your creativity. Adorable and seems “doable” – great tutorial. I will thank you again after I try my twist on this!
Amy | Canary Street Crafts
This is so pretty, Bre!!
brepurposed
Thank you, Amy!! xo
Fotini Roman
This is seriously adorable!! I love the way you assembled it <3 Found you linked up at Craftberry Bush!
brepurposed
Thank you so so much! I’m so glad you stopped by 🙂
Angela @simplybeautifulbyangela
This is by far one of the most awesome things I’ve seen in awhile! I love it and may have to make one myself next year 🙂
brepurposed
Aw thank you so much, Angela! You definitely should make one!
Kendra @ www.joyinourhome.com
Wow Bre! You hit it out of the park with this one! Love it, friend! I want to try a marquee sign now!
brepurposed
Thanks Kendra! You totally should 🙂
Kristi
LOVE, LOVE, LOVE it Bre!
brepurposed
Thanks Kristi!! xo
Bre @ Average But Inspired
Oh my gosh, I LOVE it! I am going to replicate this project at some point for sure. I like that the back looks like a bomb or something. That’s cool. 😉 GREAT job, Bre!
brepurposed
Thanks Bre! And I was totally thinking the same thing about it looking like a bomb haha. It was so easy to make, I can’t wait to see what you do!
Michelle Lepak-Dandelion Patina
Very cute holiday sign. The little clear ornaments are so dainty and work well in your project. Nice job.
brepurposed
Thank you Michelle!
Tara @ Anything & Everything
This turned out amazeballs!!! I love it! I am working on a project right now and after seeing all these amazing marquee signs I might just take it in that direction. Thanks for the inspiration!
brepurposed
10 points for using “balls” in your comment 😉 haha thanks Tara! Marquee signs are so fun! I can’t wait to see what you’re working on 🙂
Amanda @ Dwelling in Happiness
Suuuper cute, Bre! I gotta make me one of these, I have a bare wall it’d go perfect on! Love that they’re just cheap glass ornaments instead of light bulbs!
brepurposed
Thank you Amanda! And they’re plastic which is even better! 🙂
Erica
Holy. Crap. This looks so professional and amazing and Ijustwanttostealitandputitinmyhouse. AMAZING job!
brepurposed
Aw that means SO much! I’m self conscious about my hand writing (even if I’m tracing something) and am so glad you think it looks professional! Thanks friend! XO
Jen @ Girl in the Garage
Such a great idea – I love your interpretation Bre! What a fun monthly challenge to force yourself to think outside the box. 🙂
brepurposed
It was definitely a challenge to come up with something different! Thanks so much, Jen! 🙂
Michele
It turned out great! Love how appropriately done it is. I’ve been wanting to do something similar for awhile. Thank you for the pictures to show how. You make it look easy! 😉
brepurposed
Thank you so much Michele! And it WAS easy! 🙂
Katie @ Little House of Four
This is genius, love it Bre!
brepurposed
Thanks Katie!! xo
Marie@The Interior Frugalista
LOVE LOVE LOVE this idea Bre – such a creative use for clear Christmas ornaments!
brepurposed
Thank you Marie!! I really had to think hard to come up with a different use for them! 🙂
Kiescha Williams
I love it! You are so creative!
brepurposed
Aw thank you so much Kiescha! 🙂
Christina @ Operation Home
This came out adorable, Bre!! 🙂
brepurposed
Thank you Christina!! xo
Lindsay Eidahl
So cute! I love it! I love that you showed the back too. I did that in a post too! It shows the reality of a project! 😉
brepurposed
Thanks Lindsay! Just trying to keep it real around here! 😉