DIY CANE AND WOOD DESK
It was time to get rid of my cute little vintage mid century desk and upgrade to something I could actually sit at comfortably. When I saw the IKEA Alex Drawers I knew I could give them the perfect makeover and create my dream desk.

If you’ve been following along with my projects lately, you know I’m slightly obsessed with all things cane. We recently used it on the bench in the kid’s playroom and I loved how that turned out and wanted to use more of it.
My friend Aniko also used it recently on an arched cane headboard that turned out SO pretty.
My previous desk had limited counter space and was too small for my long legs. I couldn’t cross my legs underneath it or sit comfortably at it really at all.
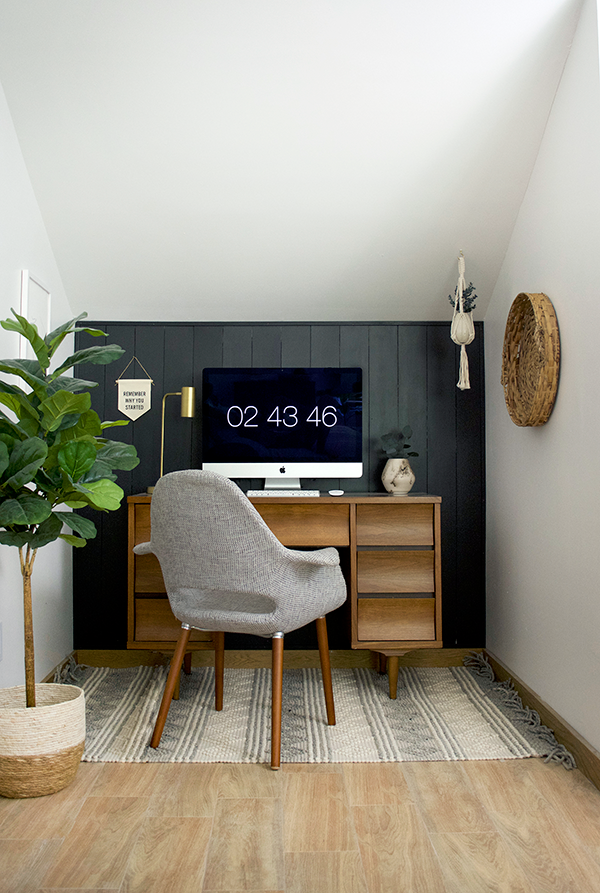
So I figured it was time I did something about that. I wanted to be able to customize it so it would fit my little nook perfectly and the IKEA Alex drawers were the perfect solution.

Of course as is, they aren’t my style at all. So it was time to hack these babies. I had a very specific vision for them that included cane webbing and wood trim/accents. So I got to work bringing that vision to life.
SUPPLIES FOR CANE AND WOOD DESK MAKEOVER
- 2 IKEA Alex Drawer Units
- Cane Webbing (I used the W700 Fine Radio Weave)
- Polyshades Spray Paint (I used Mission Oak)
- 1/4″ Plywood for sides and drawer fronts
- Wood Trim for Drawer Fronts
- Drawer Pulls
- DAP Rapid Fuse Glue
- Staple Gun
- Nail Gun
- Door Slab for Countertop
- Stain (I used Varathane Dark Walnut Gel Stain)
- Top Coat (Vermont Natural Finishes)
I’ll walk you through my process step by step so you can create this desk too!
*Note: I assembled my Alex units first before adding all the wood/cane pieces but found it would have been easier to leave it unassembled.
HOW TO BUILD YOUR CANE AND WOOD DESK
STEP 1
Cut your 1/4″ plywood to fit each of the drawer fronts. These will be rectangular in shape and cover the dip at the top of each drawer. They should be approx. 12 3/4″ x 4″ for the smaller drawers and 12 3/4″ x 5 3/4″ for the larger ones.
STEP 2
Cut the rest of your plywood to cover the sides of the Alex Cabinet. Since my desk sits between two walls, I only needed to cover the inside panels. If your desk isn’t going to be against any walls, you’ll need to cut 4 panels.
STEP 3
Using a mitre saw, cut your trim pieces that will sit on top of each drawer front. All of these cuts will be at 45°.
I used this pine screen trim I got at Lowe’s that has slightly rounded edges.


STEP 4
Next up, cut the trim that will go around the entire set of drawers on each unit. I couldn’t find trim that was the right size, so I bought 1.5″ trim and we had to cut it on the table saw down to 1″ wide. You’ll be cutting these at a 45° as well.
Here are those measurements:
4 @ 14.75″
4 @ 28″
STEP 5
Give all of your wood a light sand to remove any rough edges. I used my Ryobi corner cat sander but you can use any type of sand paper or sanding block.
STEP 6
Stain! I used Varathane Dark Walnut Gel Stain applying it with a staining pad in one coat.

STEP 7
Once dry, you can finish all your wood pieces. My favorite top coat right now is Vermont Natural Coatings.

STEP 8
If you want to change the color of your cane webbing so it isn’t natural then you can stain it by using Polyshades spray. I used it in the color Mission Oak. I like how it softens the color and gives it a more vintagey look.


STEP 9
Cut your cane webbing to the exact size of each of your drawer fronts. I cut some of mine a little smaller and it made it harder to attach the trim.
STEP 10
Attach your 1/4″ wood pieces to the fronts of each drawer. I did this by applying a generous amount of DAP rapid fuse glue.

I swear by this stuff. It’s amazing! Hold it in place for about 30 seconds. No need to clamp unless it feels like it isn’t sticking.


Repeat with each drawer.
STEP 11
Take your cane pieces and attach them to each drawer front on top of the wood you just attached using a small staple gun. Make sure your staples are small and are as flush to the drawer as possible. This will make it easier to attach the trim.

If any are sticking up, you can use a small tack hammer to hammer them in.
STEP 12
Using your Rapid Fuse glue again, glue a line along the edge of the drawer and attach ONE piece of trim at a time. I found that these were a little more stubborn and didn’t want to stick as well, so you’ll want to use some clamps to hold them in place for a couple of minutes.

I didn’t need to clamp all of them, so you can try holding them in place for 30 seconds and seeing it that works. If they’re wiggling then clamp.

This is why you shouldn’t assemble the units first. If you do (like I did) the way the drawers are put together doesn’t give you enough room around each side to use a clamp.
Repeat for all drawers.
STEP 13
Once all your drawer fronts are covered, you can assemble the Alex units.
STEP 14
Now you can attach the trim around the entire set of drawers on the front and the side panels. We did this using just a nail gun. If you want a little more extra support on the sides, you can use some liquid nails too.

STEP 15
Attach your hardware! I ordered these Edge Pulls from amazon, and was determined to make them work even though the color was off.

They were the perfect size, shape and came in a pack of 10. After some trouble with Rub ‘N Buff, I ended up using Rustoleum’s Metallic Spray Paint in Champagne Bronze and it was the perfect soft gold color.

STEP 16
If you want to do the same thing we did for the top of the desk then keep following! Otherwise, attach a top of your choice and your desk is ready to use!
We used a door slab from Lowe’s that cost us $40. It’s hollow so when you cut it to size, you will see an opening. This didn’t matter for me since it sits between two walls. You could easily cover it with a piece of trim to cover the hole or just not cut it at all if it will fit in your space.

The width was perfect, we just needed to cut down the length a bit. We did that using a circular saw.
STEP 17
Next you can stain your door to match the desk. Since they are different types of wood this might take some trial and error. I ended up using regular Minwax Dark Walnut stain for mine and then sealed it with the same top coat I used on the rest of the desk.

STEP 18
Put it all together! One thing to note is that with the size of the trim around the front, the top piece sits a little above the actual cabinet. Before you place your door or top on, you’ll want to put something under there to lift the top up a little so it isn’t resting right on the trim.

We just used a scrap piece of 1/4″ plywood on each side and it worked perfect!
I can’t tell you how happy I am with this piece! The rest of my little office nook is still a work in progress but having this extra counter space and leg room is AMAZING!


I can’t wait to finish decorating this space but I have been loving it so far! My DIY Cane and Wood Desk turned out even better than I imagined and I had so much fun hacking my first piece of IKEA furniture!
Pin for later!


Mywestcoastlife
I love this! definitely going to be attempting a version of this for our office as well!
carina
Shockingly beautiful!
brepurposed
Thank you!!!
Alicia
WOW!!! I would never have guessed that those drawers were from Ikea!
Janis Daugherty
It looks so nice! Love it!