I’m finally getting around to sharing the plans for our modern standing wine rack we built last fall for the One Room Challenge. Better late than never right? Now that I finally have it styled the way I want, I figured it was time to write this post for you guys!
HOW TO BUILD A MODERN STANDING WINE RACK

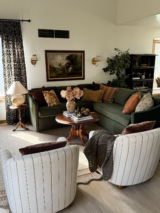
It took me a long time to figure out what I wanted to put in this corner of our dining room. I would have loved to do something built in but as you can see our thermostat and some switches live on this wall. I knew we would need somewhere to store our wine and accessories so I figured we’d make a little rack/bar cart.
MATERIALS FOR MODERN WINE RACK
Please note we made this to fit our space – you may need to adjust yours to accomodate your home.
We used pine for most of this piece and plywood for the back.
- Two 15.75″ x 30.75″ boards for the sides
- Two 2′ x 16.25″ boards for the top and bottom
- One piece of 1/4″ plywood cut to size for the back
- Two 15″ x 2′ boards for the slanted inserts
- Two 2x1s at 2′ long for the front stopper piece
FOR THE LEGS
We used 2x2s
- Two at 11″ long
- Four at 5″ long
STEP 1
Build your box. We used our Kreg Jig to connect each piece and then nailed the back on with our nail gun.

STEP 2
Add your shelves! We played around with ours for a while before figuring out where we wanted to put them. You want to make sure that it’s not at too much of an angle because you want the cork to still be touching the wine.

It’s a little tricky to match up the nail gun to the wood through the side since it’s at an angle so take your time!
STEP 3
Add the front trim piece that the bottom of the bottles will rest against. Our top one started 8″ down from the top and there is 8.5″ in between. If you are using different dimensions, just make sure you allow enough room for your glasses if you plan to put them on the bottom like we did.

STEP 4
Stain! I used my go to Dark Walnut by Minwax. Once dried, I sealed it with two coats of Polyurethane.

STEP 5
Make the legs. We had some 2x2s left over from our TV unit that we used and created them in a similar style to match. I painted them black with some satin black spray paint and we used the Kreg Jig to assemble them. Then we just nailed in through the top of the bottom shelf to hold them in place.


And that’s it! It’s pretty straight forward besides figuring out the angles of your shelves. But I love the slight tilt it gives the bottles so you can see the labels and I think it creates another cool design element! I also get a little OCD about having certain colors in there ha.


I got a lot of questions about having the glasses on the bottom with little kiddos in the house, but we haven’t had an issue at all. Hawk tried to grab them a couple times but after telling him no he’s been a good listener!
Buying something for this corner was on my mind but I’m so glad I waited it out and came up with the perfect DIY plan. Dan basically built this whole thing so I have to give him proper credit – he’s very proud of it 😉 As he should be, because I love our new Modern Standing Wine Rack!
My friend Aniko also built a gorgeous DIY Wine Rack you have to check out too!
SHOP DECOR FOR MODERN STANDING WINE RACK


Alex Ned
Hello, I know this is probably a silly question, but I’m new to wood working and wanted to know what wood exactly did you use? I know you said pine board but is that pine plywood? I’m having a hard time at my local Home Depot trying to find the correct wood and the customer service is horrible. They made me feel like an idiot when I asked for help ????
Also, how many pieces of wood did you actually purchase?
Thanks,
Alex
Rachael
Very good tutorial. However, there is a tip here, the burrs on the surface of the wood must be polished, otherwise it will scratch your hands.
MaryEl
“Nailed” it (ha ha!) once again! Great job!
brepurposed
haha thank you so much!